
How to Build a Facebook Bot in Python with Flask
Ever noticed automated assistants in Facebook pages of different organizations and companies responding really fast to customer inquiries?
See how exciting it is to get responses from a robot speaker?
In today’s tutorial, we will be doing just that. Once this tutorial ends, you will know how to deploy your own bot to Facebook so that it can automatically respond to all the messages your Facebook page gets.
Let's be more specific. In this tutorial, we will be developing a basic Facebook bot that can send messages and images to users. However, instead of building everything from scratch, we will be using the Python framework Flask to make many of the network related tasks (like the creation of endpoints) easier.
Table of Contents
You can skip to a specific section of this Python Facebook bot tutorial using the table of contents below:
What is Flask?
Flask is a Python microframework which is equipped with many tools, libraries, and supported extensions that can be easily used when we are developing Python applications. This means Flask can be used to create and develop web applications such as blogs, websites, API services, and other commercial-scale deployments. Moreover, the supported ready-made extensions that exist for Flask can be used as snippets in your applications while customizing and scaling them for many types of web applications that we develop in Python. For this application, we will be using Flask to create an endpoint that will be used by Facebook to send us data whenever a user sends us a message. Following that, we will be sending an appropriate response to continue the conversation interactively.
Let’s first create a basic Flask app and get familiar with it.
First, install Flask by using pip.
pip install FlaskNow that we are ready, let’s open up a python script and start writing our first API application.
from flask import Flask

app = Flask(__name__)

@app.route('/hello/', methods = [ 'GET', ‘POST’ ])
def hello_world():
	return "Hello World at localhost:5050"

if __name__ == '__main__':
	app.run( host = '0.0.0.0', port = 5050 )
Let’s look at the code and try to understand what we have written.
In the first line of code, we have imported Flask from flask (notice the capitalization). In the subsequent line, we have created an object of the Flask module as app. In the next code line, we are using a decorator called @app.route to describe the endpoint as well as the HTTP methods that will be allowed by this server. Next. we have defined a function, namely hello_world, that will be called when we send a request to the above URL.
In order to run the server, we are using the app.run() within a main method. Moreover, it should be noted that we are running our app inside a main method to ensure that this server does not start when it is imported in external modules but only this file. In the app.run() method, we are passing parameters specifying the host and the port which we are choosing to open our server endpoint. In this case, 0.0.0.0 is being used as the host and 5050 as the port respectively. Feel free to choose a different port here when you are running this app.
If you send a request or navigate to http://localhost:5050/, you will be greeted with a Hello World at localhost:5050. You can use Postman or any other similar app to make requests. If you think of this in a different perspective, you will realize that this is exactly what we will be doing when we are building the Facebook bot. We will use Flask and create an endpoint and let external users communicate through it.
Now that we are familiar with Flask and what we are going to do with it, let’s move on.
Requirements
We already know that Flask is one of the requirements for us to build this Facebook bot. We will also be using another special library called PyMessenger to interact with the users who send us messages. If you go through its documentation, you will see that you can do a lot of tasks such as sending messages, images, videos, and even other types of files.
Let’s install PyMessenger using pip.
pip install pymessenger
Now we are halfway there. We need to do one more thing. We are required to register for an access token by setting up a Facebook app. We are required to get a page access token and link the page and an app to send and receive messages.
Let us do that now.
Let’s first visit Facebook and login to your account and create a page or use one of the existing pages that you have created. Once we are done with that, visit Facebook for Developers and create a developer account. Then let’s visit your apps page and click create a new app.

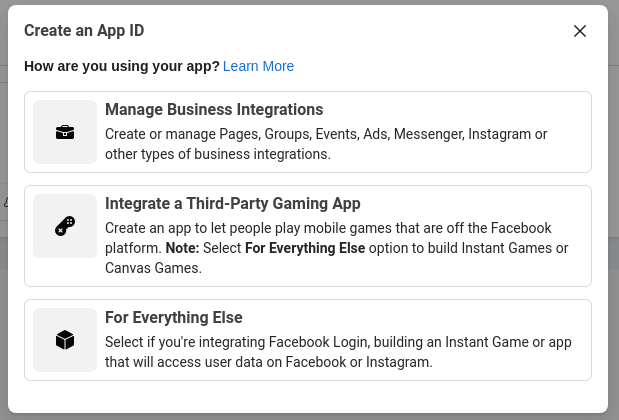
You may select the first option ‘Manage Business Integrations’. Then give your app a name, add an email, and then select the option as ‘Yourself or your own business’.
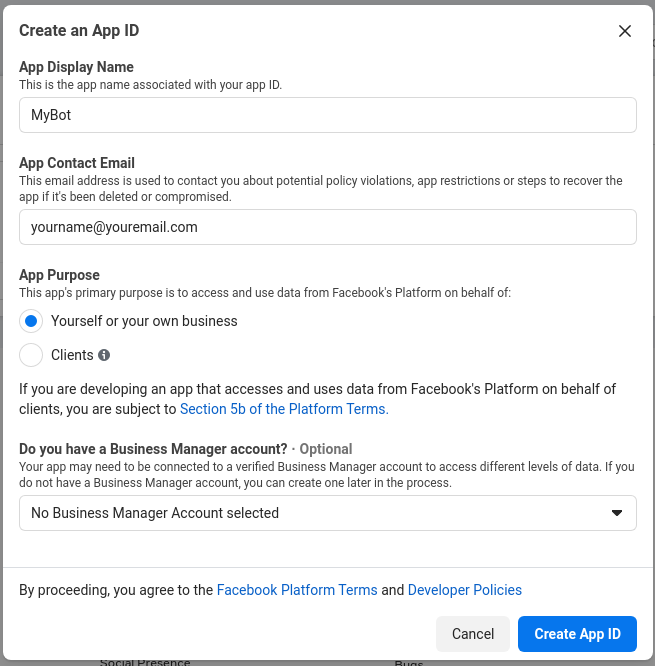
Once you are done, click Create App ID. Then you will be prompted to a page to add products to your app. Go ahead click ’Set Up’ under Messenger.

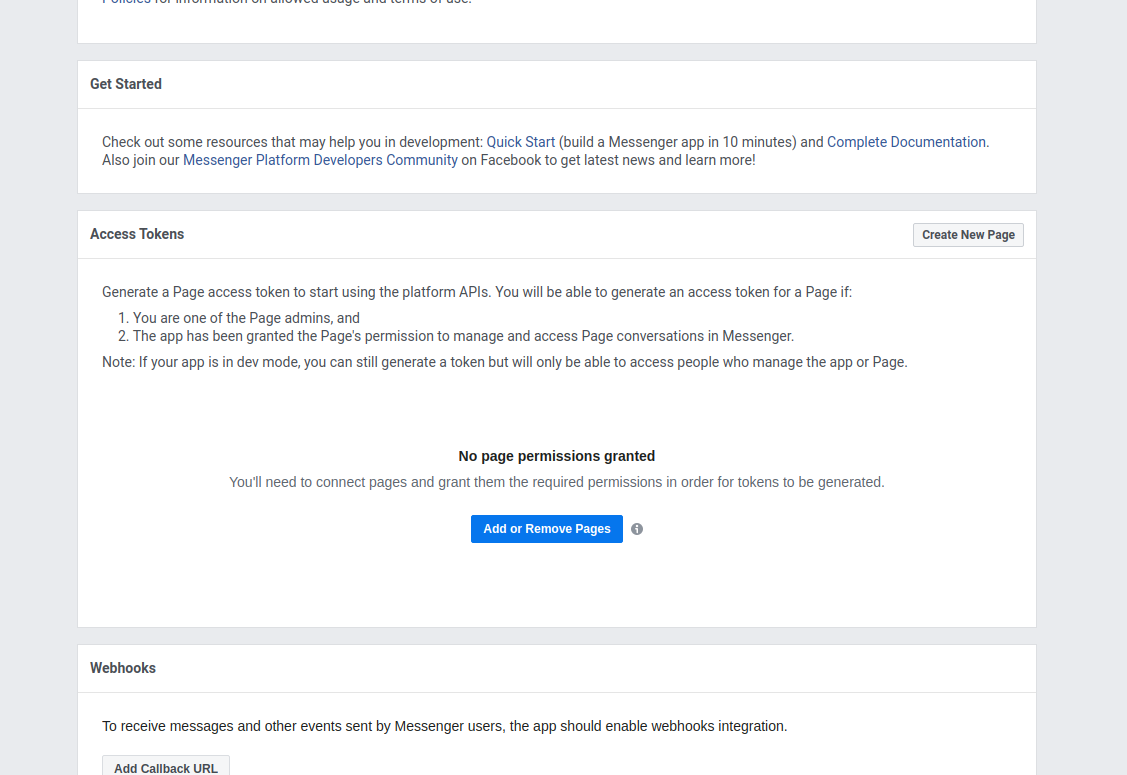
Go ahead and click the ‘Add or Remove Pages’ button and add the page you created.
We then have to take care of hosting before we move further. Let’s develop our code before we move onto that. Do not close the above developer account page. Leave it here because once we have coded our bot, we will be coming back to the ‘Webhooks’ section of it.
Developing the Bot
It is now the time to write some codes to build our bot. We will mainly be engaging with the request types GET and POST. Let’s get an idea about them now.
- GET - These requests fulfill the task of requesting data from a remote server and retrieving it at the client’s side. In our case, we will be using GET request when the tokens are being checked by Facebook.
- POST - These requests cater to the functionality of sending data to the remote server
Let’s write a similar Flask app as before with a function called retrieve messages. If you are lazy, you can even just change the hello_world() function name, change the imports, and start.
from flask import Flask, request

app = Flask(__name__)

@app.route("/", methods=['GET', 'POST'])
def retrieve_messages():
	if(request.method == 'GET'):
	token = request.args.get("hub.verify_token")
	return verify_token(token)

if __name__ == '__main__':
	app.run(host='0.0.0.0', port=5050)
Let’s now take a look at what we have done. We have defined the decorator to only accept GET and POST requests. Then, we have defined a retrieve_messages() function to check if the request is GET and generates a token and returns and passes it to a function called verify_token which we will create later.
Then, we need to specify what happens if the retrieve_messages() function receives a POST request. This is how we will receive messages that have been sent to us by the users. Let’s add that part to our code now.
from flask import Flask, request

app = Flask(__name__)

@app.route("/", methods=['GET', 'POST'])
def retrieve_messages():
	if(request.method == 'GET'):
		token = request.args.get("hub.verify_token")
		return verify_token(token)
	elif(request.method == 'POST'):
		output = request.get_json()
		for event in output['entry']:
			messaging = event['messaging']
			for message in messaging:
				if message.get('message'):
					recipient_id = message['sender']['id']
					if message['message'].get('text'):
						response_sent_text = generate_message ()
						message_send(recipient_id, response_sent_text)
					if message['message'].get('attachments'):
						response_sent_nontext = generate_message()
						message_send(recipient_id, response_sent_nontext)
	return "Processed"


if __name__ == '__main__':
	app.run(host='0.0.0.0', port=5050)
Let’s look at what we have added. We are considering the condition when we are receiving a POST request. This is the way we will communicate with the messages we receive from the users. Then we are respectively retrieving a JSON object to the output variable, finding an ‘entry’ attribute, getting its ‘messaging’ attribute, and getting the ID using ‘message’ attribute. We can later use this recipient_id object to send a response of choice. Then, we are using the generate_message function to generate a response and sending using the message_send method. In the event we receive an attachment instead, we are using the next lines of codes to respond to that the same way.
We will now write the functions verify_token, generate_message, and message_send.
def verify_token(token):
	if token == VERIFY_TOKEN:
		return request.args.get("hub.challenge")
	return 'Verification token is invalid'
Let’s take a look at the code. In the first line inside the function, we are considering a global variable called VERIFY_TOKEN and seeing if it tallies with the token we passed earlier. Then, if it tallies, we are good to go.
Let’s now take a look at the generate_message function.
import random
def generate_message():
	motivatonal_responses = ["We believe in you!", "You are a star.", "Keep up all the good work!", "You are awesome!"]
	return random.choice(motivatonal_responses)
Let’s look at the code. We are having a list of responses and we are randomly selecting one of them and returning. In this, we are just demonstrating how we can generate and send a message. Instead of this, if you want, you can connect one of the smart assistants here and let it handle the rest of the conversation providing appropriate and effective responses to interact with the users in a much intelligent way. This is how we see lots of corporate as well as healthcare providers having smart assistants providing really good customer service and keeping their business up and running 24x7 across time zones.
Let’s now move on to the next function message_send.
from pymessenger.bot import Bot
bot = Bot(ACCESS_TOKEN)

def message_send(recipient_id, response):
	bot.send_text_message(recipient_id, response)
	return "success"
We are importing the Bot module from pymessenger.bot and creating an instance of it by initiating it with the ACCESS_TOKEN we have. Then we are using its send_text_message function by passing the recipient_id object we saved earlier and the response.
Now that we have everything, let’s look at the whole code altogether.
import random
from flask import Flask, request
from pymessenger.bot import Bot


app = Flask(__name__)
ACCESS_TOKEN = 'YOUR_ACCESS_TOKEN'
VERIFY_TOKEN = 'YOUR_VERIFY_TOKEN'
bot = Bot(ACCESS_TOKEN)

@app.route("/", methods=['GET', 'POST'])
def retrieve_messages():
	if(request.method == 'GET'):
		token = request.args.get("hub.verify_token")
		return verify_token(token)
	elif(request.method == 'POST'):
		output = request.get_json()
		for event in output['entry']:
			messaging = event['messaging']
			for message in messaging:
				if message.get('message'):
					recipient_id = message['sender']['id']
					if message['message'].get('text'):
						response_sent_text = generate_message ()
						message_send(recipient_id, response_sent_text)
					if message['message'].get('attachments'):
						response_sent_nontext = generate_message()
						message_send(recipient_id, response_sent_nontext)
	return "Processed"


def verify_token(token):
	if token == VERIFY_TOKEN:
		return request.args.get("hub.challenge")
	return 'Verification token is invalid'


def generate_message():
	motivatonal_responses = ["We believe in you!", "You are a star.", "Keep up all the good work!", "You are awesome!"]
	return random.choice(motivatonal_responses)


def message_send(recipient_id, response):
	bot.send_text_message(recipient_id, response)
	return "success"


if __name__ == "__main__":
	app.run(host='0.0.0.0', port=5050)
Now that our app is built, let’s move onto hosting it.
Hosting the Bot
We are required to have our bot run somewhere. For this, we have plenty of options like hosting it in a virtual machine in a cloud server. However, for starters, we can always host it in our own machine using ngrok. It is a secure way of giving access to your localhost to remote servers. Let’s setup ngrok now in our computer following these official instructions.
Once you are done, let’s run the app we coded. Open up a terminal and locate where your app is. Then, use python myapp.py to run it. Open up another terminal and type ngrok http 5050. Another window will open with the running ngrok session. Make sure to copy the https://xxxxxxx.ngrok.io address from it. We will be providing this link to Facebook to send messages.
Now go back to your Facebook developer section and go to ‘Webhooks’.

MYTESTINGTOKEN.. We are now officially done with hosting our bot.
Let’s do some testing.
Testing
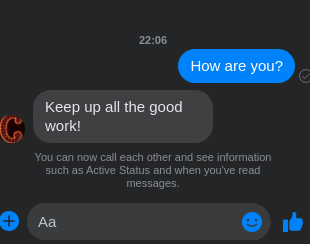
Visit the page you created using one of your friend's accounts and send it a message. You will notice that it responds to you with one of the sample texts we entered in the list.
Final Thoughts
So, there it is. This is how we can develop a Facebook bot using PyMessenger and Flask and host it in our own machine. Make sure that you do not host the same way when you are doing a production build. Feel free to add new functionalities and even try out different NLP algorithms in your generate_message function.