
How to Build a RESTful API in Python with Flask
When software and applications are being developed, it is sometimes important that the teams are able to share their work and publicize it as a service.
Sometimes, even within the same software, there could be components that require integration with another internal module.
For instance, if our software is a ticketing system, there could be a calculation module that might calculate the final cost including the taxes and vats. This can be easily made possible with the APIs.
The ability to build and maintain an API is important. This article will teach you how to build a RESTful API in Python using the Flask framework.
Table of Contents
You can skip to a specific section of this Python API tutorial using the table of contents below:
What are APIs?
API is one of the most heard terms in the field of software engineering. Even most of the non-technical users of the internet are somewhat familiar with this term API. It stands for application programming interface. APIs can be identified as a software intermediary that acts as an interface for applications to communicate with each other, accept external requests, and respond appropriately abiding by the set of rules that have been specified by the developers.
APIs usually are independent entities that offer functionalities to the external world without having to publicize how its internals work. Therefore, APIs really support the concept of building software as blocks of codes. Moreover, this helps developers to start writing software not from the scratch but rather as pre-built reusable components. Not only does this speed up the software development process but also helps teams to collaborate and even offer their APIs as a service to other teams and organizations.
Usually, when we are talking about APIs, we are naturally referring to REST APIs. REST APIs are programming interfaces with a specific set of predefined rules and these interfaces can be accessed via HTTP adhering to these set of rules. There are also methods supported by the developers of the API allowing the external parties to interact with it. These methods are as follows.
- GET - These types of requests cater to the functionality of requesting data from a remote server and retrieving it at the client’s side.
- POST - These types of requests are associated with sending data to the remote server.
- PUT - These requests are also used to send and modify data in a remote server.
- DELETE - These requests are used to delete any persisting data in a remote database.
As an example, let’s take a look at how we send a GET request and retrieve data from a remote server.
import requests
import json
response = requests.get("http://api.open-notify.org/iss-now.json")
print(json.loads(response.text) )
In this, we are requesting the current position of the International Space Station using the open API provided by Open Notify. If we look at the code, we are importing the requests library and using the requests.get() method to retrieve a response. Then we are printing it using the json.loads() method and the text attribute of the response we received.
Output:
{'message': 'success', 'iss_position': {'latitude': '41.9740', 'longitude': '150.8389'}, 'timestamp': 1600591768}This is how we can interact with an API as the client. In this tutorial, we will be developing the server-side application to cater to the needs of clients who are requesting our service. We will be using Flask for that and let’s now take a look at what it is and what we can do with it.
What is Flask?
Flask is a microframework for Python that is used for creating web applications ranging from websites, blogs, to any commercial-scale web applications. This means, Flask is equipped with and supports lots of tools and libraries to develop a web application easily. Moreover, the extensions that exist for Flask can be easily used, customized, and scaled for all kinds of web applications that we develop.
In this tutorial, we will be using Flask to develop an API and see how we can customize it to facilitate the needs of our application.
Let’s get started.
Creating a Basic Flask Application
Before we proceed, we are required to install Flask. Let’s open up a terminal or a command prompt and install it using pip.
pip install FlaskNow that we are ready, let’s open up a python script and start writing our first API application.
from flask import Flask

app = Flask(__name__)

@app.route('/welcome/', methods=['GET'])
def welcome():
	return "Welcome to localhost:5050"

if __name__ == '__main__':
	app.run(host='0.0.0.0', port=5050)
Let’s look at the code and see what we have done.
In the first line, we have imported Flask. Then in the next line, we have created an instance of the Flask class as app. In the next line, we are using the @app.route decorator to specify the URL endpoint as well as the methods that will be accepted. Then we have defined a welcome function that will be triggered when we send a call to the above URL.
Finally, we have specified the app.run() within the main method. We are using the main method here to make sure that our app does not start when it is imported in other places but only the main file. In the app.run() method, we have also specified the host as well as the port to which we are choosing to open our API. We are using 0.0.0.0 as our host and our port as 5050. We have chosen 0.0.0.0 giving out the idea that all addresses of the local machine. Feel free to choose a different port.
To sum up, when we send a request to localhost:5050/welcome/ we should be getting our response. Let’s execute our code and send a request to that URL. For this, you can either copy and paste the URL directly in the browser as we are sending a GET request with no parameters so you can use Postman.
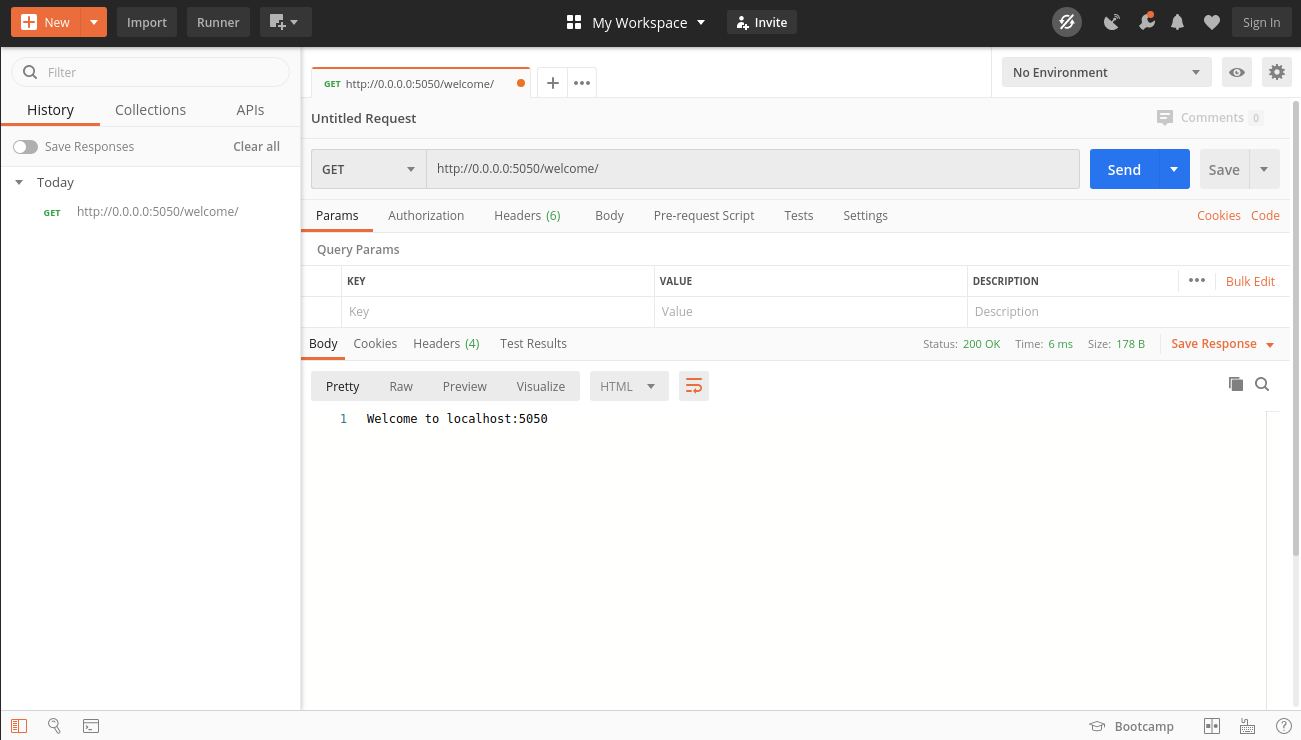
Output:
Welcome to localhost:5050Now that we have created a basic application with a single functionality of returning a welcome message, we are ready to proceed.
A Flask Application with Multiple Functionalities
Developing an API application is not just about sending out a welcome message. There are many more functionalities that can be offered through the API. In this section, we will look at a few example codes and see how we can add different types of functionalities to our API application.
1. Variable Path
Ever seen customized welcome messages that says Hello along with your name? Let’s try to do that now.
from flask import Flask
app = Flask(__name__)

@app.route('/welcome/<name>', methods=['GET'])
def welcome(name):
	return 'Welcome ' + name

if __name__ == '__main__':
	app.run(host='0.0.0.0', port=5050)
Let’s use Postman and send the following GET request.
http://0.0.0.0:5050/welcome/Josh
Output:
Welcome Josh
Let’s take a look at the code. In this, we have slightly changed the URL we are specifying by using the @app.route decorator. We have added a <name> path specifying that it indeed is a variable. Then, we have passed it to the welcome() function and have concatenated it to the string that we are returning as a welcome message. Feel free to try out your name and see how it returns a personalized welcome message.
Let’s briefly change the @app.route decorator as well as the welcome function and add another variable to print out the country.
from flask import Flask
from flask import jsonify

app = Flask(__name__)

@app.route('/welcome/<name>/<country>', methods=['GET'])
def welcome(name, country):
	return 'Hello ' + name + ' from ' + country

if __name__ == '__main__':
	app.run(host='0.0.0.0', port=5050)
Let's send the request as http://0.0.0.0:5050/welcome/Valterri/Finland.
Output:
Hello Valterri from Finland 2. Returning JSON Responses
JSON is abbreviated as JavaScript Object Notation. It is an open standard for file and data interchange format. It uses textual data and transmits them as key-value pairs and array types. When it comes to developing APIs, it is a standard practice that we send responses as JSONs. Let’s take a look at an example.
from flask import Flask
from flask import jsonify

app = Flask(__name__)
@app.route('/welcome/<name>/<country>', methods=['GET'])
def welcome(name, country):
	return jsonify({'name':name,'country':country})

if __name__ == '__main__':
	app.run(host='0.0.0.0', port=5050)
Let’s send the same request as earlier.
http://0.0.0.0:5050/welcome/Valterri/Finland
Output:
{
	"country": "Finland",
	"name": "Valterri"
}
This is how we usually deal with passing data and information with responses. If we look at the very first example we did as a client, the response we received was in the JSON format as key-value pairs.
3. Returning Status Code
Status codes play an important role in conveying information about the status of the request we have made. To get an idea, the following are some of the common status codes that we come across when we are dealing with APIs.
Before we proceed further, let’s have an idea about the status codes.
- 200 – OK
- 204 – No Content
- 301 – Moved Permanently
- 400 – Bad Request
- 401 – Unauthorized
- 403 – Forbidden
- 404 – Not Found
- 500 – Internal Servier Error
As the developer of an API, we can embed status codes into the responses we send. Let’s take a look at an example.
from flask import Flask
from flask import jsonify

app = Flask(__name__)

@app.route('/welcome/<name>/<country>', methods=['GET'])
def welcome(name, country):
	return jsonify({'name':name, 'country':country}), 418

if __name__ == '__main__':
	app.run(host='0.0.0.0', port=5050)
Instead of the default 200 status code which says OK, we are sending the status code 418 which says I’M A TEAPOT. You can see it in Postman under the Status section.
4. Before Request
There are certain instances when we sometimes want to execute a method by default prior to responding to a request that has been received. There is a special decorator called before_request just for this. Let’s take a look at an example.
from flask import Flask

app = Flask(__name__)

@app.before_request
def before_func():
	print("Hello. I am before request!")

@app.route('/welcome/')
def welcome():
	return "Hello. I am the response!"

if __name__ == '__main__':
	app.run(host='0.0.0.0', port=5050)
If we look at the Postman output, we will see that we have received the response as
Hello. I am the response!However, if we also look at the terminal, we will notice that there is also a printed string in there that says Hello. I am before request!. Moreover, it can also be seen that the request has been dealt with only after the program as printed the above line.
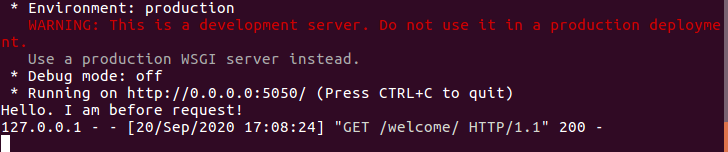
before_request decorator can really come in handy for many circumstances such as when we are supposed to either send a 3rd party notification to a different server or to keep a custom log of the requests and the times that we receive them.
Final Thoughts
APIs are a great way to interconnect different applications and their services which have been developed by different teams and organizations. Moreover, it is one of the key approaches a developer can use to reduce the development time and really make their application based on pluggable building blocks. Moreover, application programming interfaces also provide a good way of integrating services from other parties into your application without having to heavily bulk its size.
Flask is a great way to develop web applications using Python language. It has provided and supports a range of tools and extensions that may come in handy for various kinds of applications. When we are developing API servers, Flask allowed us to develop and deploy a server easily using just a few lines of codes. However, when we are using Flask to develop, there is one primitive thing that we need to look out for.
Take a look at the following two decorators and respective functions.
@app.route('/welcome/')
def welcome():
	return "Welcome page"

@app.route('/goodbye')
def goodbye():
	return "Goodbye page"
In this, we have specified the URLs using the decorators. However, if noticed correctly, the welcome decorator has a trailing slash while the goodbye decorator does not have any. If we send requests, we can expect two behaviors out of these two.
Whether we send the request as [http://0.0.0.0:5050/welcome](http://0.0.0.0:5050/welcome) or http://0.0.0.0:5050/welcome/, it will return Welcome page as the response. However, if we send the request to goodbye() following the same patterns, we will only get a response for http://0.0.0.0:5050/goodbye. We will get a 404 NOT FOUND as the status code for the one with the trailing slash.
So there it is. That is how we can develop an API service using Flask and Python. Feel free to visit Flask documentation to learn more.