
How to Create Database Objects Using Django Migrations
The Django Web Framework uses files, called Django migrations, to make modifications to your database schema.
As an example, if you'd like to add a new row to a Django database, migrations files would help you do that. Similarly, Django migration files would be generated if you want to create an entirely new database table.
Changes to your database schema aren't the only reason why you might use database migration files. This tutorial will explain how to create database objects (equivalent to row entries) using Django migrations.
Table of Contents
You can skip to a specific section on this tutorial of how to create database objects using Django migrations using the table of contents below:
What is Django Migration
Django uses Migration functionality to propagate changes to a model into the given database. These migrations can be done when a model is created, updated, or deleted.
Django uses a model class to represent a database table, and an instance of that class represents a particular record in that database table. This allows Django to represent database objects as Python objects.
Django framework has built-in support to interact with relational databases such as MySQL, PostgreSQL, or SQLite. Django allows us to interact with these databases without needing to write SQL queries. This is done using the object-relational mapper or ORM. The object-relational mapper provides the functionality to write Django models, where each defined database field will get mapped to the corresponding field in the database without the need for using SQL queries.
The following example demonstrates a simple Django module class with its corresponding table structure in an SQLite database:
class FruitsInfo(models.Model):
    id = models.IntegerField(primary_key=True)
    name = models.CharField(max_length=30)
    origin = models.CharField(max_length=60)
    price = models.DecimalField(max_digits=4,null=False,decimal_places=2)
    availability = models.IntegerField(default=0)

    def __str__(self):
            return self.origin + " " + self.name
FruitsInfo Table | Field Name | Data Type | |--------------|-----------------------| | id | Integer (Primary Key) | | name | varchar(30) | | origin | varchar(60) | | price | decimal | | availability | integer |
The (__str__) method defines the string representation of the object which will return the defined values for the FruitsInfo class. Any object created using this class will return the same.
Migration Commands
Django comes with the following migration commands to interact with the database schema.
- migrate - used for applying and removing migrations.
- makemigrations - create new migrations based on changes made to models.
- sqlmigrate - displays SQL statements for a given migration.
- showmigrations - lists projects migrations and their status.
Migrations allow us to interact and manage the database without having to write SQL statements. Additionally, migrations can be considered as a version control system for the database. While makemigrations command packages the changes made to models into individual migrations files and the migrate command is used to apply the packaged migrations into the database.
Django makes migrations for any changes done to the applications models or fields even if the change does not affect the database. This is done so because having all the historical data relating to the specific model or fields allows accurate reconstructing of data. The migration files of each application reside in a “migrations” directory. Migrations are designed to be committed to and distributed as a part of the codebase. Using migrations allows the users to produce a consistent dataset from development to production environments.
Simple Django Migration
Let us take a look at the functionality of each migration command. We will be utilizing a Django project called “bookshop” and within the project, we have an app called “book_details”.
.\book_details\models.py
from django.db import models
from django.core.validators import MinLengthValidator, MaxValueValidator, MinValueValidator

class BookDetails(models.Model):
    book_id = models.CharField(primary_key=True, max_length=30, validators=[MinLengthValidator('5')])
    name = models.CharField(max_length=250)
    author = models.CharField(max_length=100)
    author_id = models.CharField(max_length=100)
    price = models.DecimalField(max_digits=4,null=False,decimal_places=2, validators=[MinValueValidator('1.0')])
    availability = models.IntegerField(default=0, validators=[MaxValueValidator('200')])

    def __str__(self):
            return self.author + " - " + self.name
We have created a simple model class called “BookDetails” to capture the basic details of a book. Now, let us move to create a table in the SQLite database using this class.
First, we will check for any errors in our module.
python manage.py checkRESULT

Makemigrations command is used to make a migration file using the defined model. This will generate a migrations file with all the operations to be carried out in the database.
python manage.py makemigrations book_detailsRESULT

0001_initial.py migration file
import django.core.validators
from django.db import migrations, models
class Migration(migrations.Migration):
initial = True
dependencies = [
]
operations = [
migrations.CreateModel(
name='BookDetails',
fields=[
('book_id', models.CharField(max_length=30, primary_key=True, serialize=False, validators=[django.core.validators.MinLengthValidator('5')])),
('name', models.CharField(max_length=250)),
('author', models.CharField(max_length=100)),
('author_id', models.CharField(max_length=100)),
('price', models.DecimalField(decimal_places=2, max_digits=4, validators=[django.core.validators.MinValueValidator('1.0')])),
('availability', models.IntegerField(default=0, validators=[django.core.validators.MaxValueValidator('200')])),
],
),
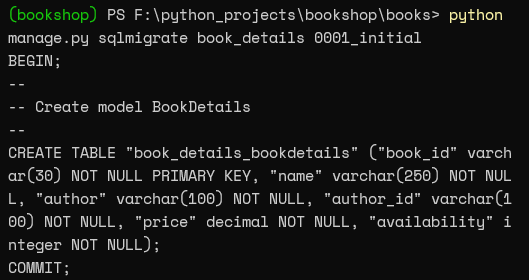
]Then using the sqlmigrate command, we can identify the SQL commands that will be used to create the table structure. The output states that we will be using the common CREATE TABLE SQL command to create the table.
python manage.py sqlmigrate book_details 001_initialRESULT
Finally, we can write the changes to the database using the migrate command. The migrate command is the only function that makes direct changes to the database. Because it is the initial migration of the app, Django will migrate all the necessary administrative models in addition to the user-defined model.
python manage.py migrateRESULT

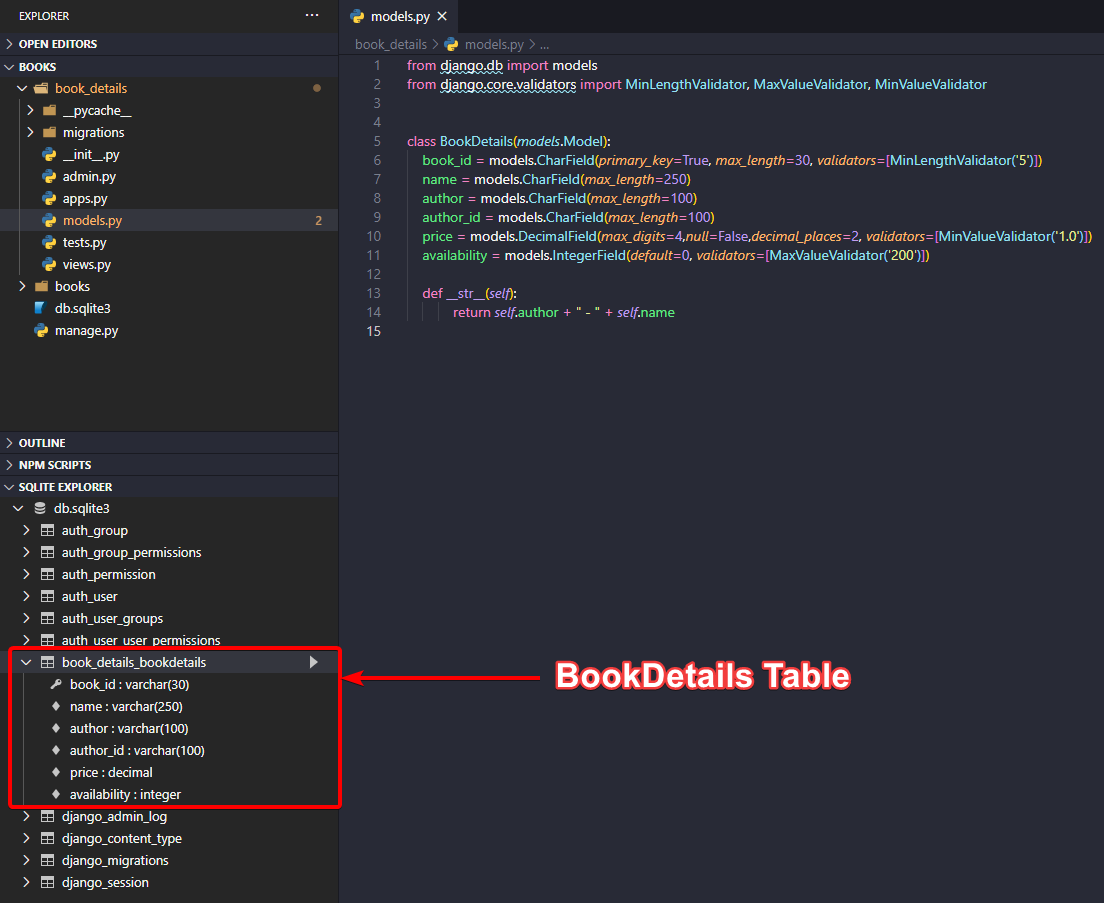
We can use the Django Shell to access the database and check if the table is created. However that can be tedious work. We will use the Visual Studio Code with the SQLite extension to easily access the database.
SQLite extension
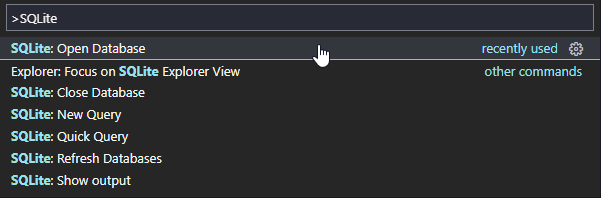
Install the extension and open the SQLite database of the project using the Command Palette. We can simply browse the database from SQLite explorer and verify if the table was created as defined in the model.
Visual Studio Code Command Palette.
Exploring the SQLite Database
Creating Objects
Utilizing the Django shell, we can create some objects of the BookDetails model. Remember each new object of the BookDetails class is considered a new record in the database. We will create three records.
Creating objects (new records)
from book_details.models import BookDetails

record = BookDetails.objects.create(book_id="B0001",name="World History",author='R K James', author_id='A0044',price=22.3, availability=30)

record = BookDetails.objects.create(book_id="B0002",name="Alien Origins",author='James T Kirk', author_id='A0144',price=35, availability=10)

record = BookDetails.objects.create(book_id="B0003",name="Story of the Cat",author='C Harris', author_id='A5644',price=10, availability=50)
RESULT

Let us call all the objects within the BookDetails class using the following commands.
from book_details.models import BookDetails

BookDetails.objects.all()

BookDetails.objects.all().values()
RESULT
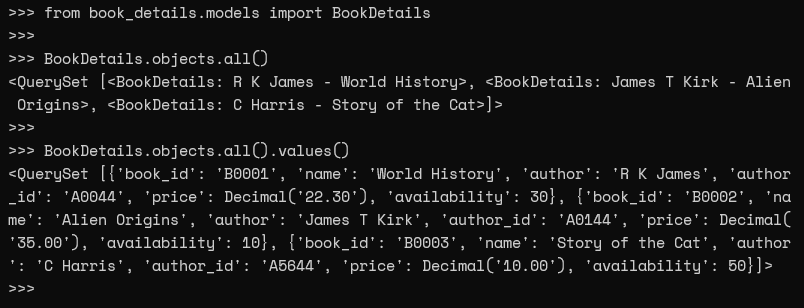
It's important to note that we received the string representation of each object defined in the (str) method.
Advanced Migrations
Django Models can accommodate complex table structures and relationships. Here we will discuss how we can define multiple tables and define relationships between each table using Foreign Keys with the model.
Modifying the Database Tables
We will create a separate table to store author details and link the two tables using a Foreign Key. In the “AuthorDetails” model, we allow Django to manage the primary key as an auto-generated id field and add a custom selection to indicate the author's active status.
.\book_details\models.py
from django.db import models
from django.core.validators import MinLengthValidator, MaxValueValidator, MinValueValidator


class BookDetails(models.Model):
    book_id = models.CharField(primary_key=True, max_length=30, validators=[MinLengthValidator('5')])
    name = models.CharField(max_length=250)

    # Define the ForeignKey Relationship
    # on_delete is set to PROTECT to prevent accidental AuthorDetails deletion
    author = models.ForeignKey('AuthorDetails', verbose_name='Authors', on_delete=models.PROTECT)
    price = models.DecimalField(max_digits=4,null=False,decimal_places=2, validators=[MinValueValidator('1.0')])
    availability = models.IntegerField(default=0, validators=[MaxValueValidator('200')])

    def __str__(self):
            return self.name


class AuthorDetails(models.Model):
    # Activity Status Choices
    author_active = 'ACTIVE'
    author_inactive = 'INACTIVE'

    ACTIVE_STATUS = (
        (author_active, 'Active'),
        (author_inactive, 'Inactive'),
    )

    first_name = models.CharField(max_length=100)
    middle_name = models.CharField(max_length=100, null=True)
    last_name = models.CharField(max_length=150)
    email = models.EmailField(max_length=150)
    author_status = models.CharField(max_length=10, choices=ACTIVE_STATUS)
    address = models.CharField(max_length=250, null=True)

    class Meta:
        # Proper plural name
        verbose_name_plural = "Authors"

    def __str__(self):
        return self.first_name + " " + self.last_name
Before continuing to make the migrations first let us check for any errors in the modified model.py file.
python manage.py check --tag modelsRESULT
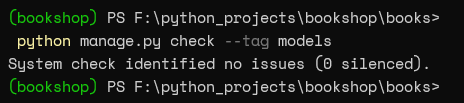
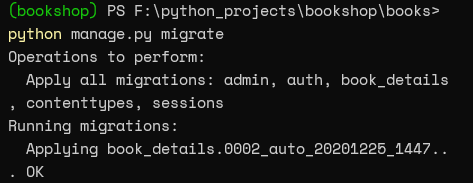
The Django framework did not identify any issues. So we will continue to make the migration file. The migrations file clearly states the modifications that will be done to the database.
python manage.py makemigrationsRESULT
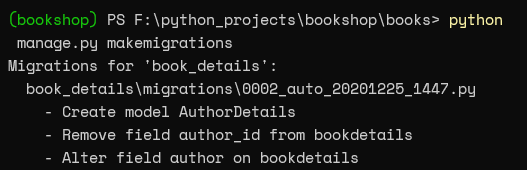
.\bookdetails\migrations\0002auto202012251447.py
from django.db import migrations, models
import django.db.models.deletion

class Migration(migrations.Migration):

    dependencies = [
        ('book_details', '0001_initial'),
    ]

    operations = [
        migrations.CreateModel(
            name='AuthorDetails',
            fields=[
                ('id', models.AutoField(auto_created=True, primary_key=True, serialize=False, verbose_name='ID')),
                ('first_name', models.CharField(max_length=100)),
                ('middle_name', models.CharField(max_length=100, null=True)),
                ('last_name', models.CharField(max_length=150)),
                ('email', models.EmailField(max_length=150)),
                ('author_status', models.CharField(choices=[('ACTIVE', 'Active'), ('INACTIVE', 'Inactive')], max_length=10)),
                ('address', models.CharField(max_length=250, null=True)),
            ],
            options={
                'verbose_name_plural': 'Authors',
            },
        ),
        migrations.RemoveField(
            model_name='bookdetails',
            name='author_id',
        ),
        migrations.AlterField(
            model_name='bookdetails',
            name='author',
            field=models.ForeignKey(on_delete=django.db.models.deletion.PROTECT, to='book_details.authordetails', verbose_name='Authors'),
        ),
    ]
The corresponding SQL commands for this modification can be found using the sqlmirgate command.
python manage.py sqlmigrate book_details 0002RESULT
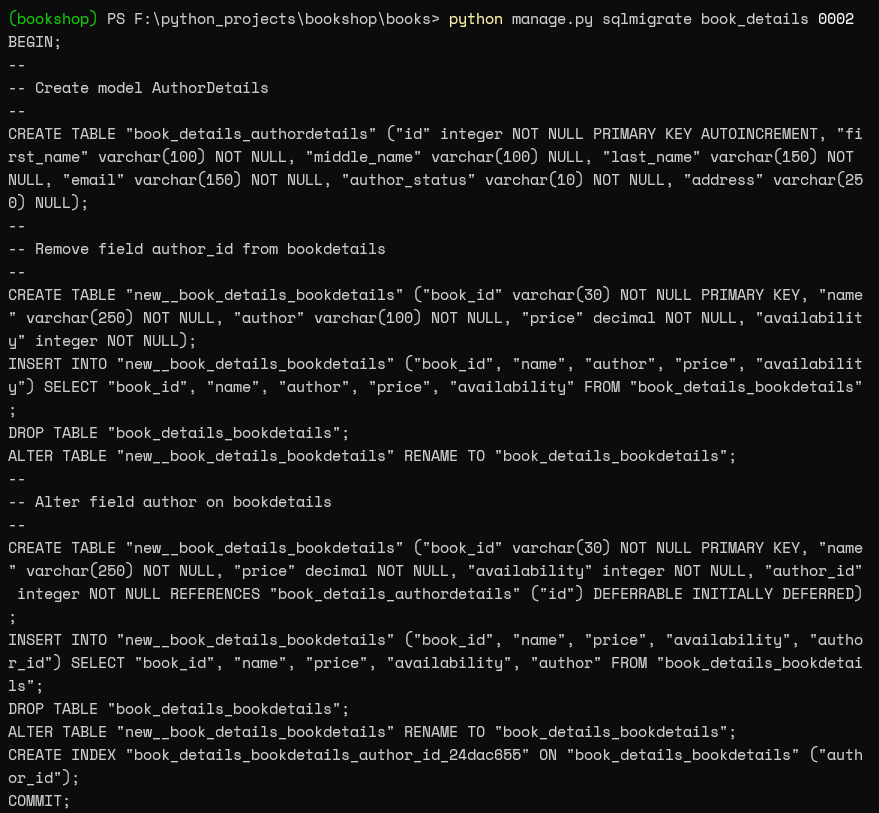
Django framework eliminates the need to write these SQL queries as it will automatically be generated according to the defined module. Note that the “bookdetails” table is already populated and if we try to make the migrations that affect the fundamental structure of a table, the changes will not propagate.
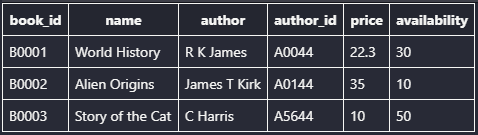
The current data structure in the table
Because we are creating a relationship using the author field to the new “AuthorDetails” class, the migration command will raise an IntegrityError because there is no corresponding record in the “AuthorDetails” table.
IntegrityError

We can mitigate this issue by simply deleting the records within the “BookDetails” table using the Django shell and recreate new objects according to the new table structure. This is only done because we are in a test environment and handling a small dataset. Using the Django shell, the records in the “BookDetails” table are deleted.
from book_details.models import BookDetails

BookDetails.objects.all().values()

BookDetails.objects.all().delete()

BookDetails.objects.all().values()
RESULT
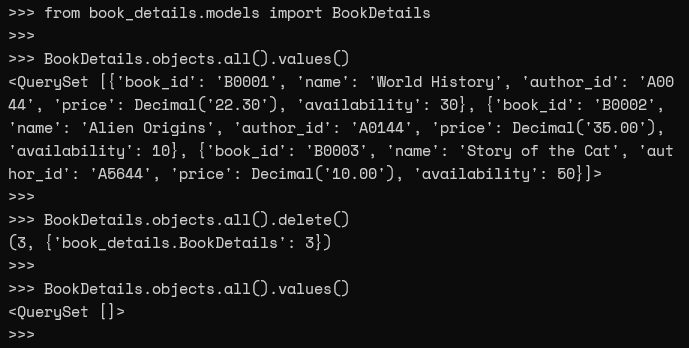
After deleting the records, we can safely make the migrations to alter the database structure.
python manage.py migrateRESULT
Let us check the modified table structure using the SQLite Explorer in vscode.
SQLLite Explorer

Creating new Objects
First, we need to populate the “authordetails” table because the Foreign Key of “bookdetails” table points to a specific record within the “authordetails” table. Let us add five authors to the table using the bulk insert command.
from book_details.models import AuthorDetails

AuthorDetails.objects.bulk_create([
AuthorDetails(first_name='Ross', last_name='James', email='ross.james@gmail.com', author_status=AuthorDetails.author_active, address='56, Woodlane, New York, New York'),
AuthorDetails(first_name='James', middle_name='Tiberius', last_name='Kirk', email='jtkirk@outlook.com', author_status=AuthorDetails.author_inactive, address='01, ST Drive, Los Angeles, California'),
AuthorDetails(first_name='Claire', last_name='Harris', email='claireauthor@gmail.com', author_status=AuthorDetails.author_active),
AuthorDetails(first_name='Jaime', last_name='Oliver', email='joliver001@yahoo.com', author_status=AuthorDetails.author_active),
AuthorDetails(first_name='Jenifer', last_name='Wu', email='jen.wu@outlook.com', author_status=AuthorDetails.author_active, address='125, Lake View, Miami, Florida'),
])
RESULT
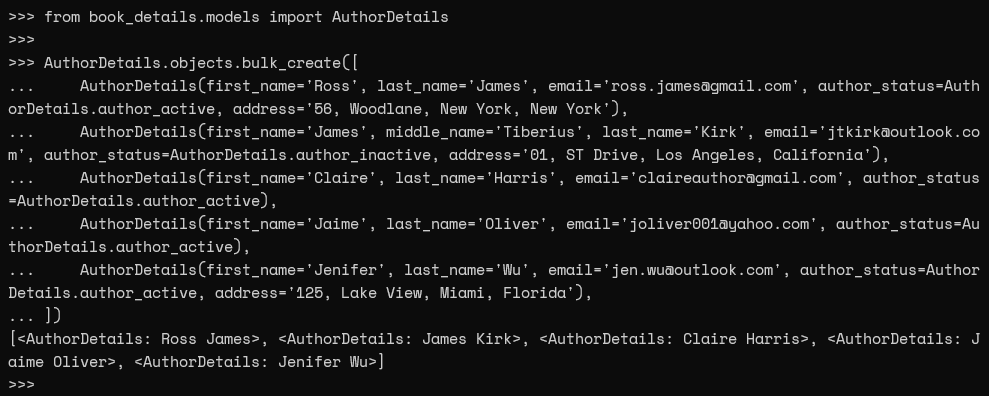
Table Structure (VsCode - SQLite)

from book_details.models import BookDetails,AuthorDetails

author_record = AuthorDetails.objects.get(id=1)

record = BookDetails.objects.create(book_id="B0001",name="World History",author=author_record, price=22.3, availability=30)

BookDetails.objects.all().values()
RESULT

Notice the difference in the author field in the output. We have defined the author field when creating the object. However, as this is a Foreign Key field, Django will automatically convert the specified author_record object to the corresponding record in the “authordetails” tables.
The following diagram illustrates the relationship between the objects.
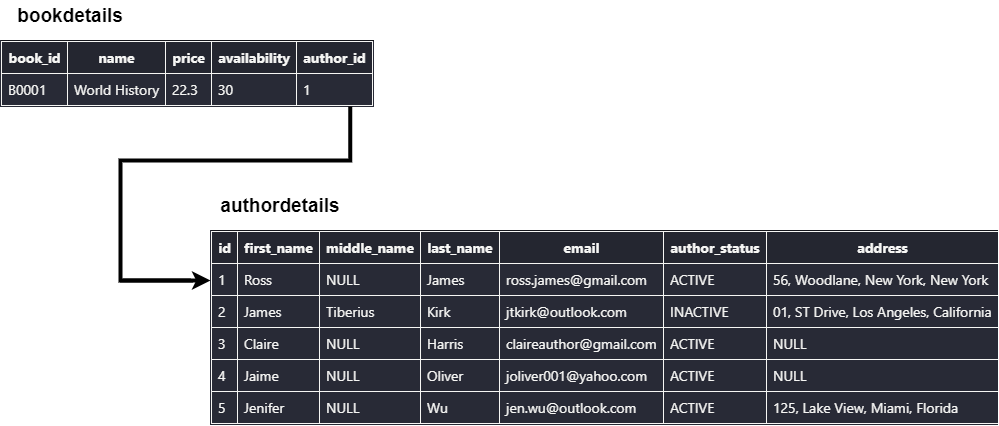
Next, let us create additional objects (records) for the BookDetails class.
from book_details.models import BookDetails,AuthorDetails

author_record = AuthorDetails.objects.get(first_name='Claire', last_name='Harris')

record = BookDetails.objects.create(book_id="B0002",name="Story of the Cat",author=author_record, price=10, availability=50)

author_record = AuthorDetails.objects.get(first_name='James', middle_name='Tiberius')

record = BookDetails.objects.create(book_id="B0003",name="Alien Origins",author=author_record, price=35, availability=10)
RESULT

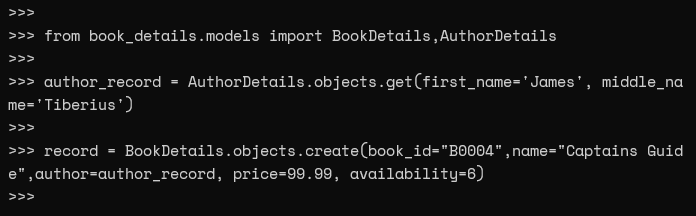
Until now, we have only associated a single “bookdetails” record with a corresponding record in the “authordetails” record. This is called a one-to-one relationship between records. However, we can associate multiple records in the bookdetails table with a single author record using the Foreign Key. From a single “authordetails” record (author object), we can associate that author with multiple books. The database term for this is a one-to-many relationship.
from book_details.models import BookDetails,AuthorDetails

author_record = AuthorDetails.objects.get(first_name='James', middle_name='Tiberius')

record = BookDetails.objects.create(book_id="B0004",name="Captains Guide",author=author_record, price=99.99, availability=6)
RESULT
Let us verify the objects within the BookDetails class using the Django Shell and the SQLite plugin in Visual Studio Code.
from book_details.models import BookDetails

BookDetails.objects.all()

BookDetails.objects.all().values()
RESULT

Table Structure (VsCode - SQLite)

Final Thoughts
In this article, we have learned what Django migrations are and how they can be used to create database objects. Django migrations allow users to quickly create applications with a specified database structure. Using models to define the database objects, eliminates the need to use SQL separately. The models can range from simple classes with a few fields to complex classes with multiple relationships, data types, validations, options, etc...