
In this lesson, we will work through the installations and configurations necessary for you to work through this course. Specifically, we will install:
- PostgreSQL - the actual SQL engine that we use to store data
- PgAdmin - a graphical user interface for connecting to PostgreSQL and submitting queries
Note that while I designed this tutorial from the perspective of a Mac user, it should be very similar for people working through this course on a Windows operating system.
Two Important Warnings
People often make two small errors while downloading PostgreSQL that will force them to restart this tutorial from the very beginning. Accordingly, I wanted to point out these errors from the start so that you know what not to do:
- Do not open the
dvdrentalfile directly using your Finder application. We will be interacting with this file using the PgAdmin software we'll download later. - Do not forget your PostgreSQL password! Unlike many passwords we encounter in our day-to-day digital lives, there are no easy ways to reset the password for your database.
With that out of the way, let's start the process of installing our software!
Step 1: Download PostgreSQL
To download postgreSQL, the easiest first step is to head over to Google and search for postgreSQL:
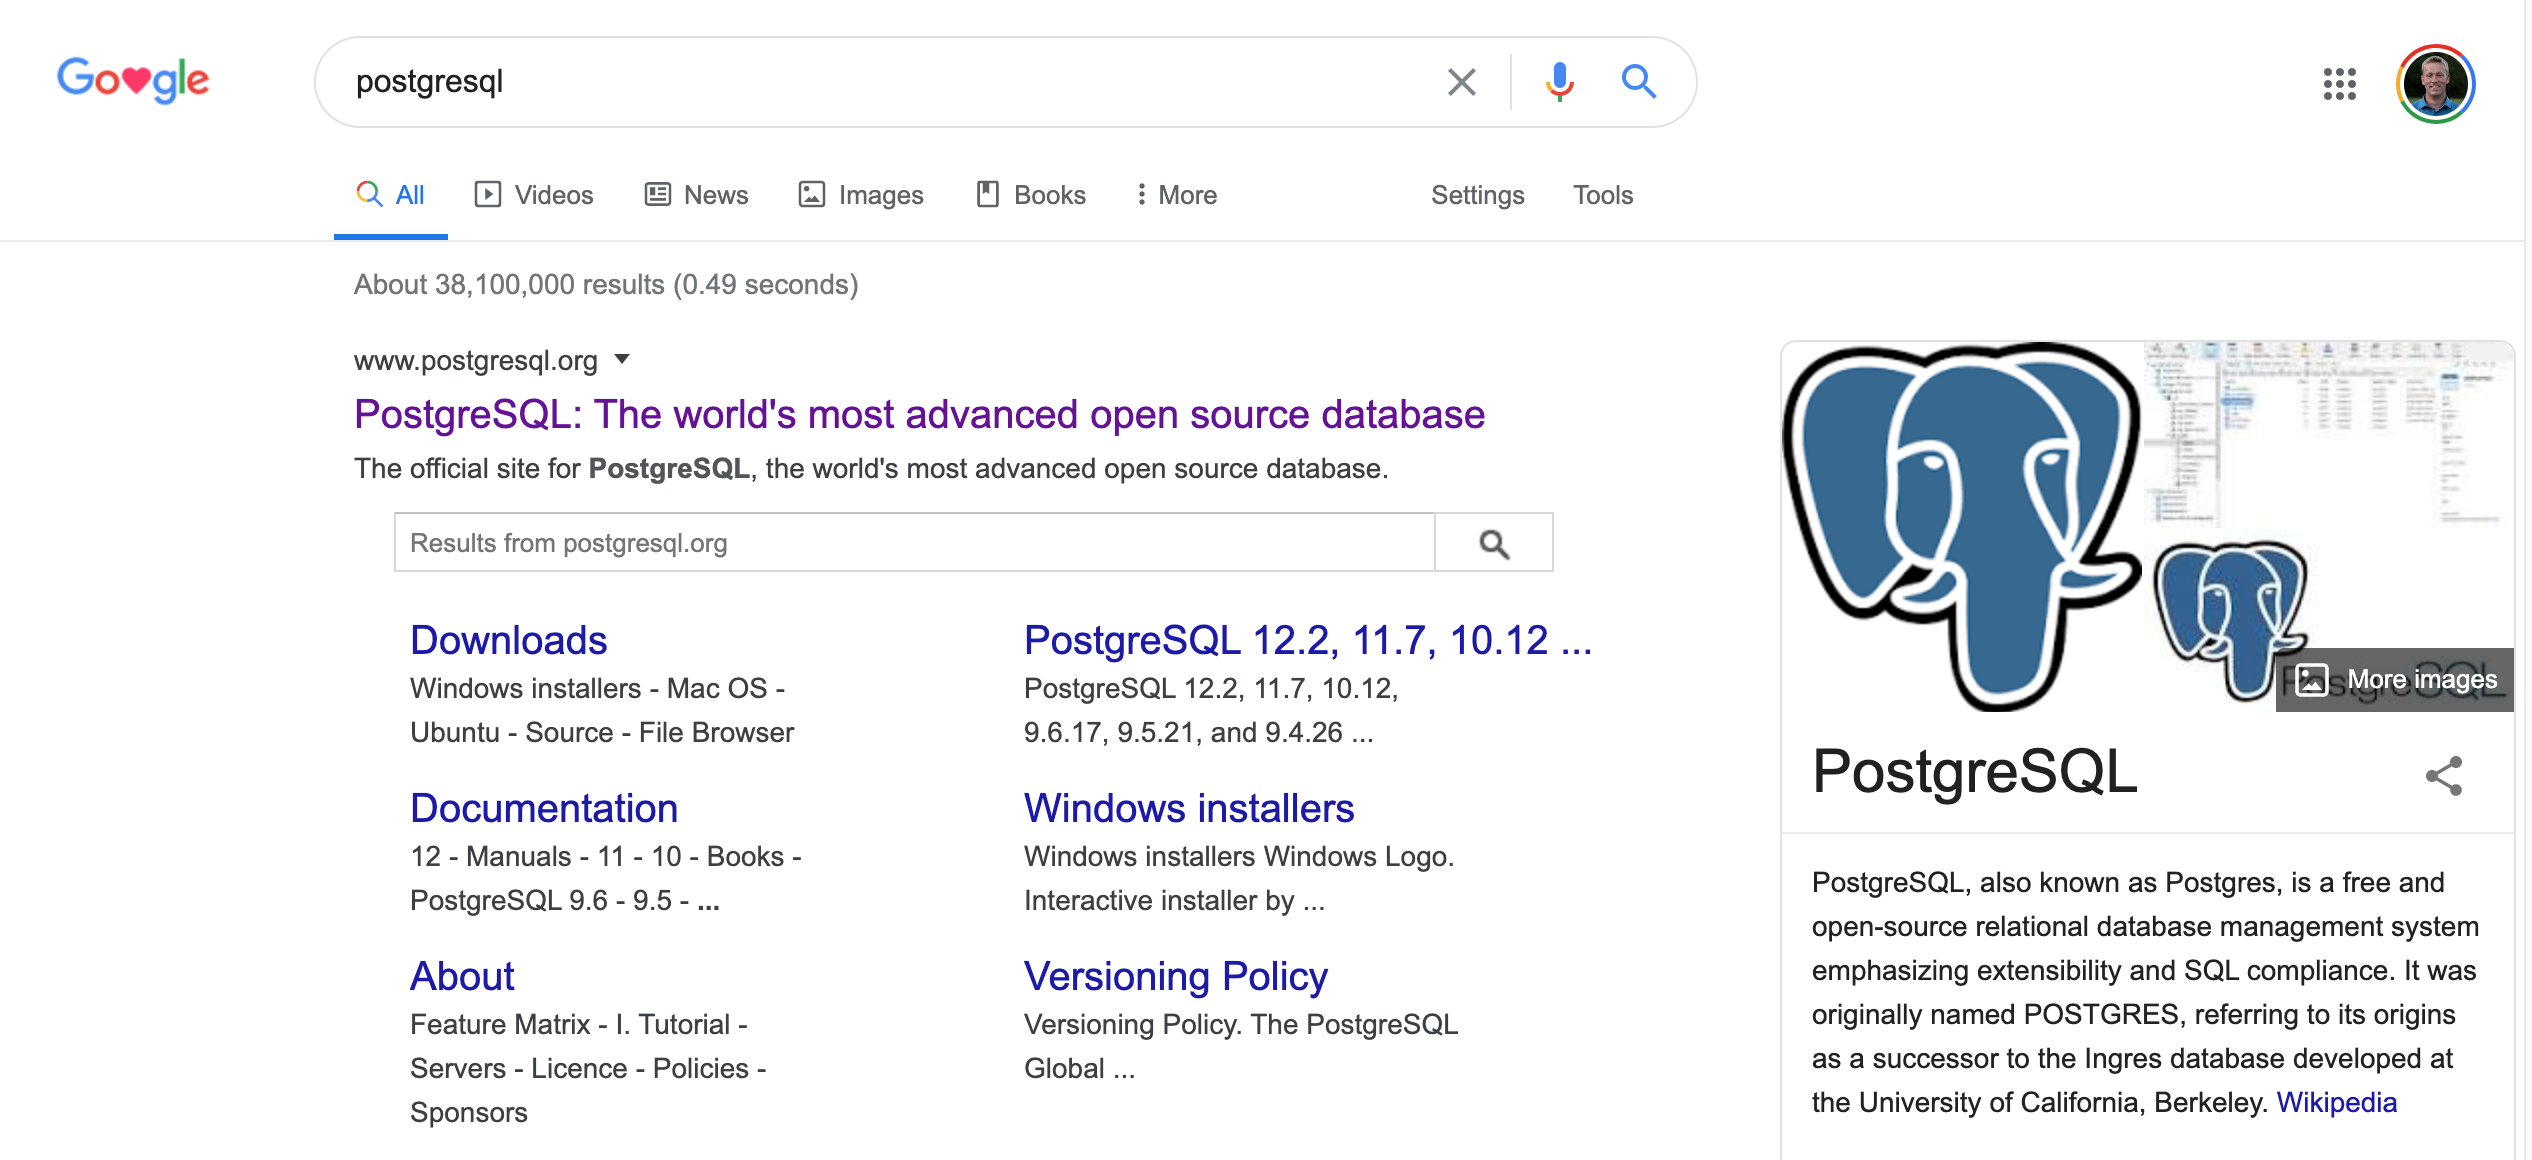
The first result is the one we're looking for.
Once you have navigated to the postgreSQL website, click the large Download button at the top of the screen.
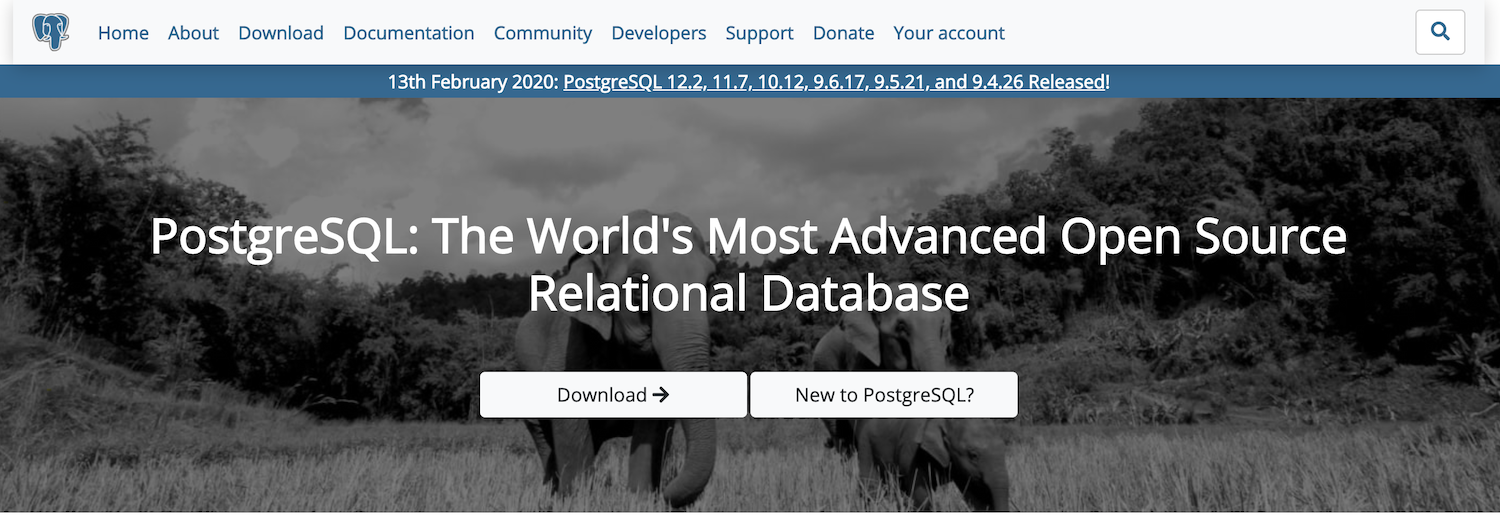
This will take you to another page where it asks you to specify which postgreSQL distribution you'd like: MacOS, Windows, Linux, or something else. If you are a Mac user, click macOS. If you are a Windows user, click Windows.
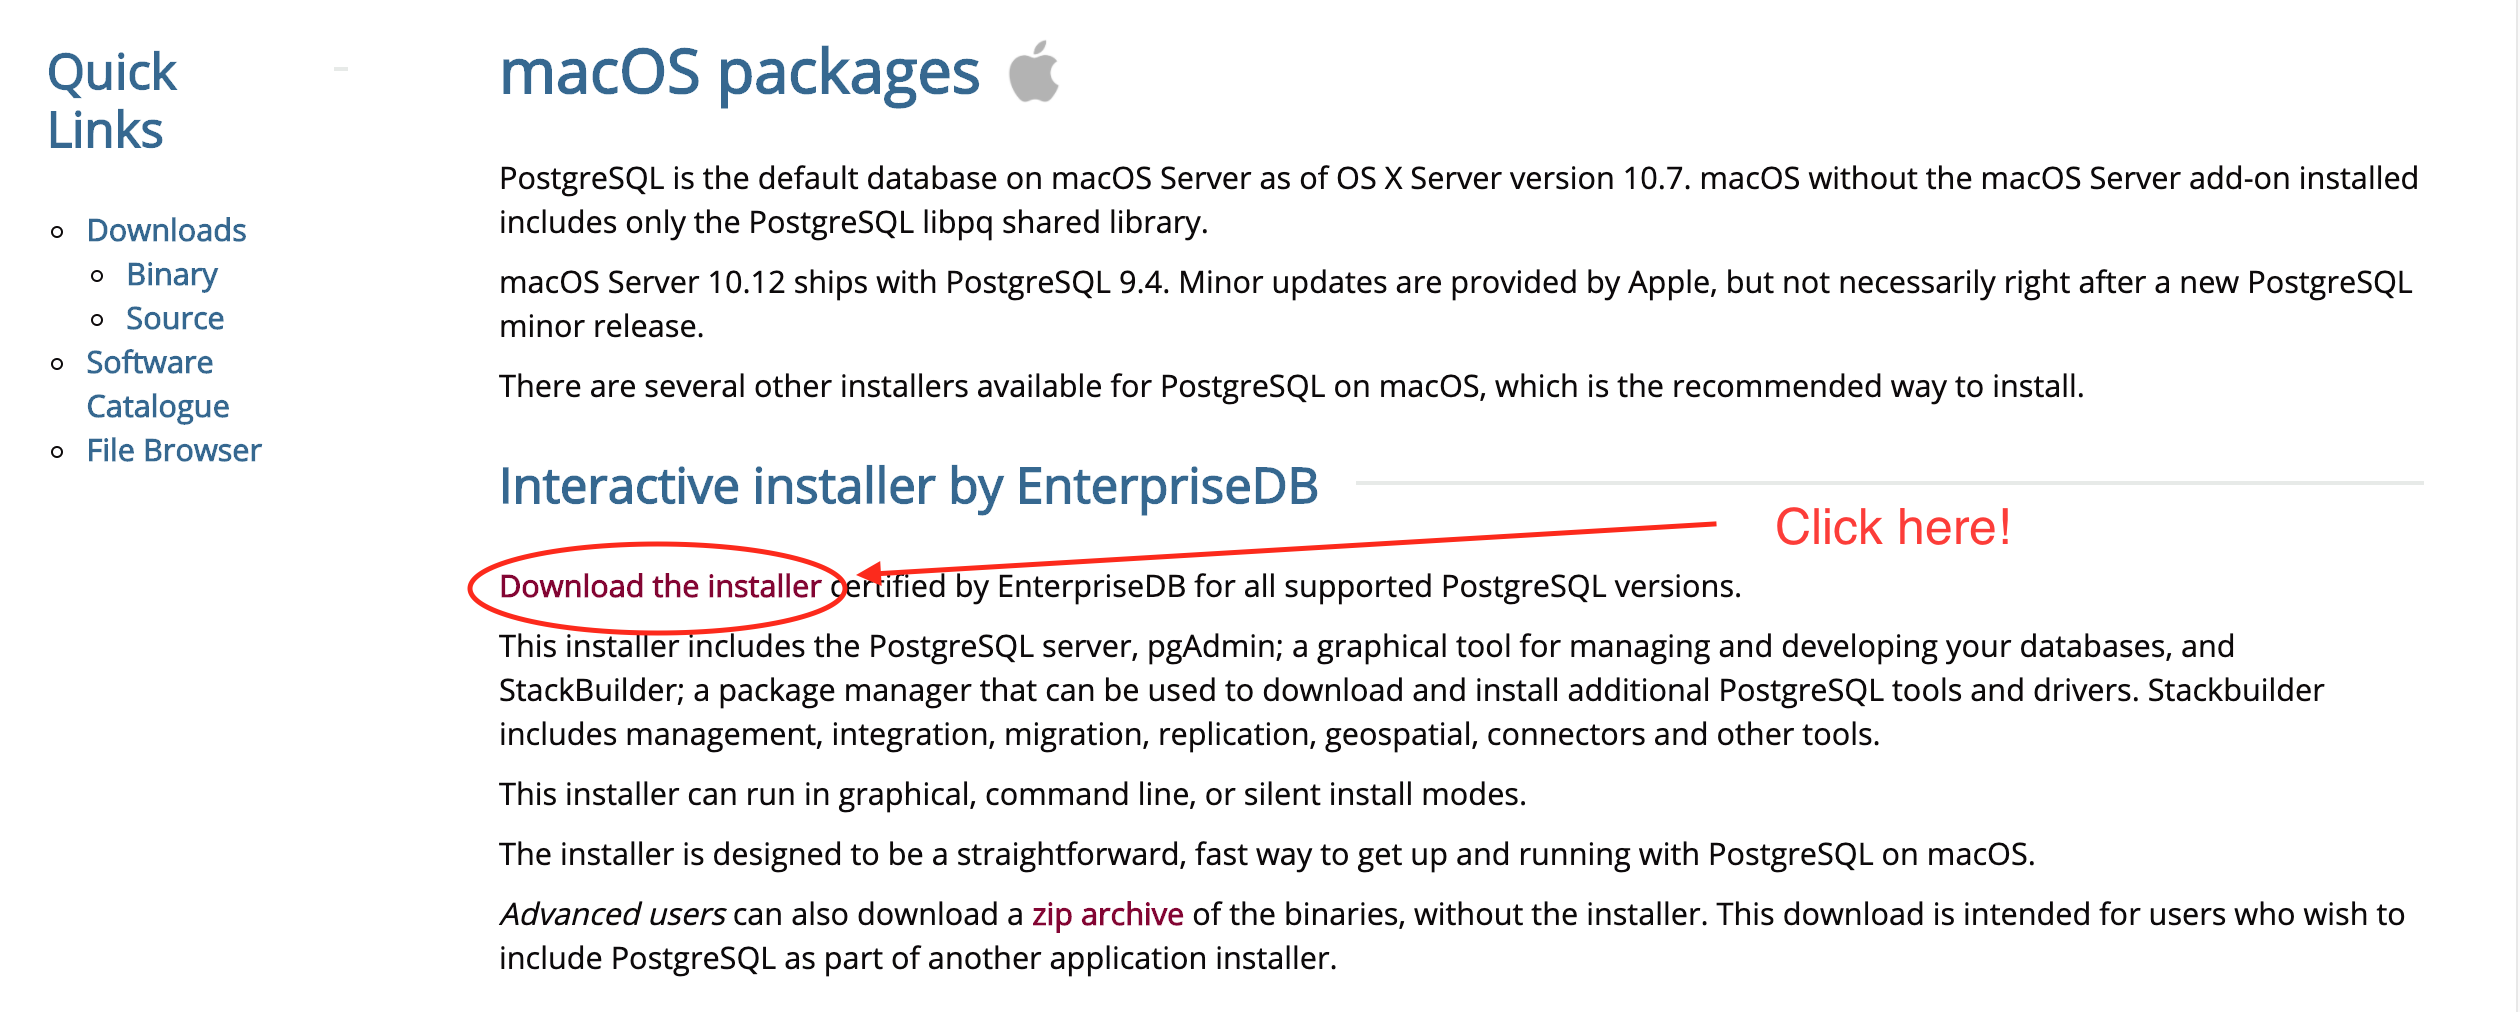
The next screen has instructions for how to install postgreSQL. We will be using the interactive installer by EnterpriseDB. Accordingly, click on the link specified in the image below:
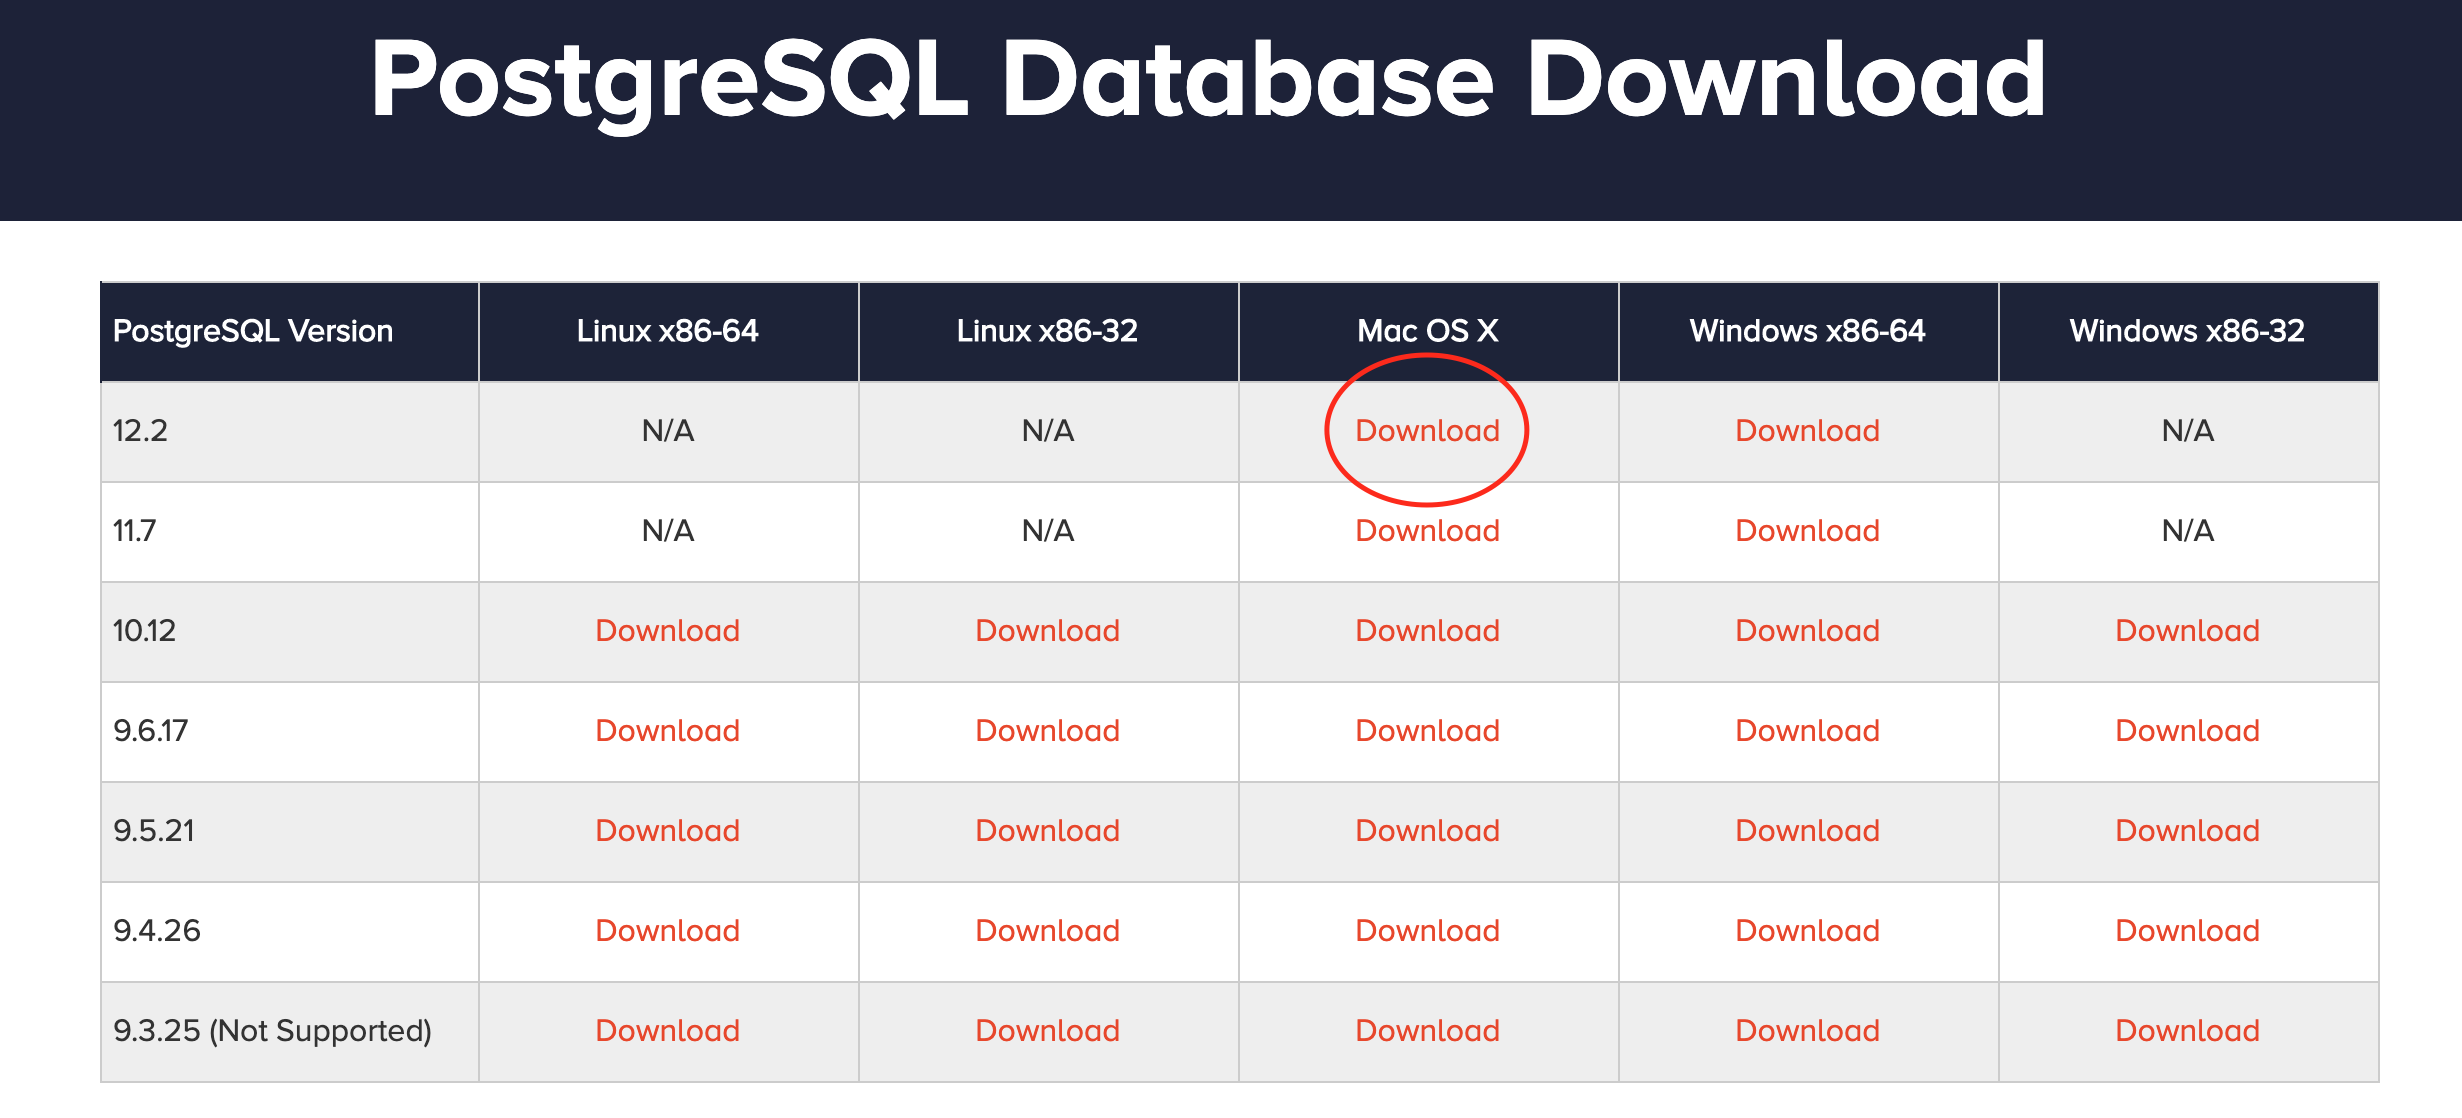
The next screen presents a grid of the different versions of postgreSQL that are available along with their compatibility with different operating systems. In general, you'll usually want to download the most recent postgreSQL distribution that is available on your operating system. In my case, this is postgreSQL 12.2, as circled below:
This will download a .zip file into your Downloads folder.
Step 2: Install PostgreSQL
We have downloaded the necessary postgreSQL files to our computer, and now we need to install them.
Navigate to your Downloads folder. You will see a file with a title similar to postgresql-12.2-3-osx.dmg. Click this file to unzip it.
Once the file is done being unzipped, a new window will open that looks like this:

Double-click on the postgresql-12.2-3-osx file to start the installation process. This will open the postgreSQL setup wizard, which will ask you to specify an installation directory. It is fine to use the default installation directory in our case.
Next, the wizard will ask which components you'd like to install along with postgreSQL, including the following elements:
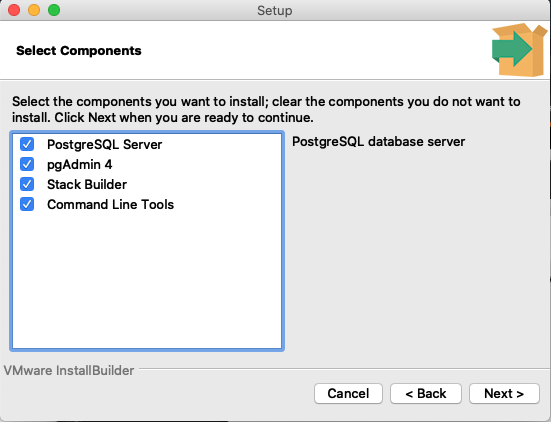
It is fine to include all of these components. Click Next to proceed through the installation process.
The next page will ask you to specify a data directory. Once again, it is fine to use the default directory.
THE NEXT PAGE IS EXTREMELY IMPORTANT. This is where you specify your password for your postgreSQL database. If you ever forget this password, you will need to uninstall and reinstall everything related to postgreSQL. Because of this, be sure to note your password somewhere safe.
Once your password has been specified, the postgreSQL wizard will ask you which port you'd like to use. The port number will specify 5433 if you have never installed postgreSQL before; although it may show up as 5432 depending on your computer's configuration. It is fine to leave this value as whatever it pre-populates as.
The last step in this installation is to specify the locale to be used by the new database cluster. We will leave this as its default value of [Default Locale]. You can click Next here and then Next on the Ready to Install page to begin the installation!
Step 3: Download PgAdmin
Our next step is to install pgAdmin, which is the graphical user interface that we will be using to interact with postgreSQL in this course.
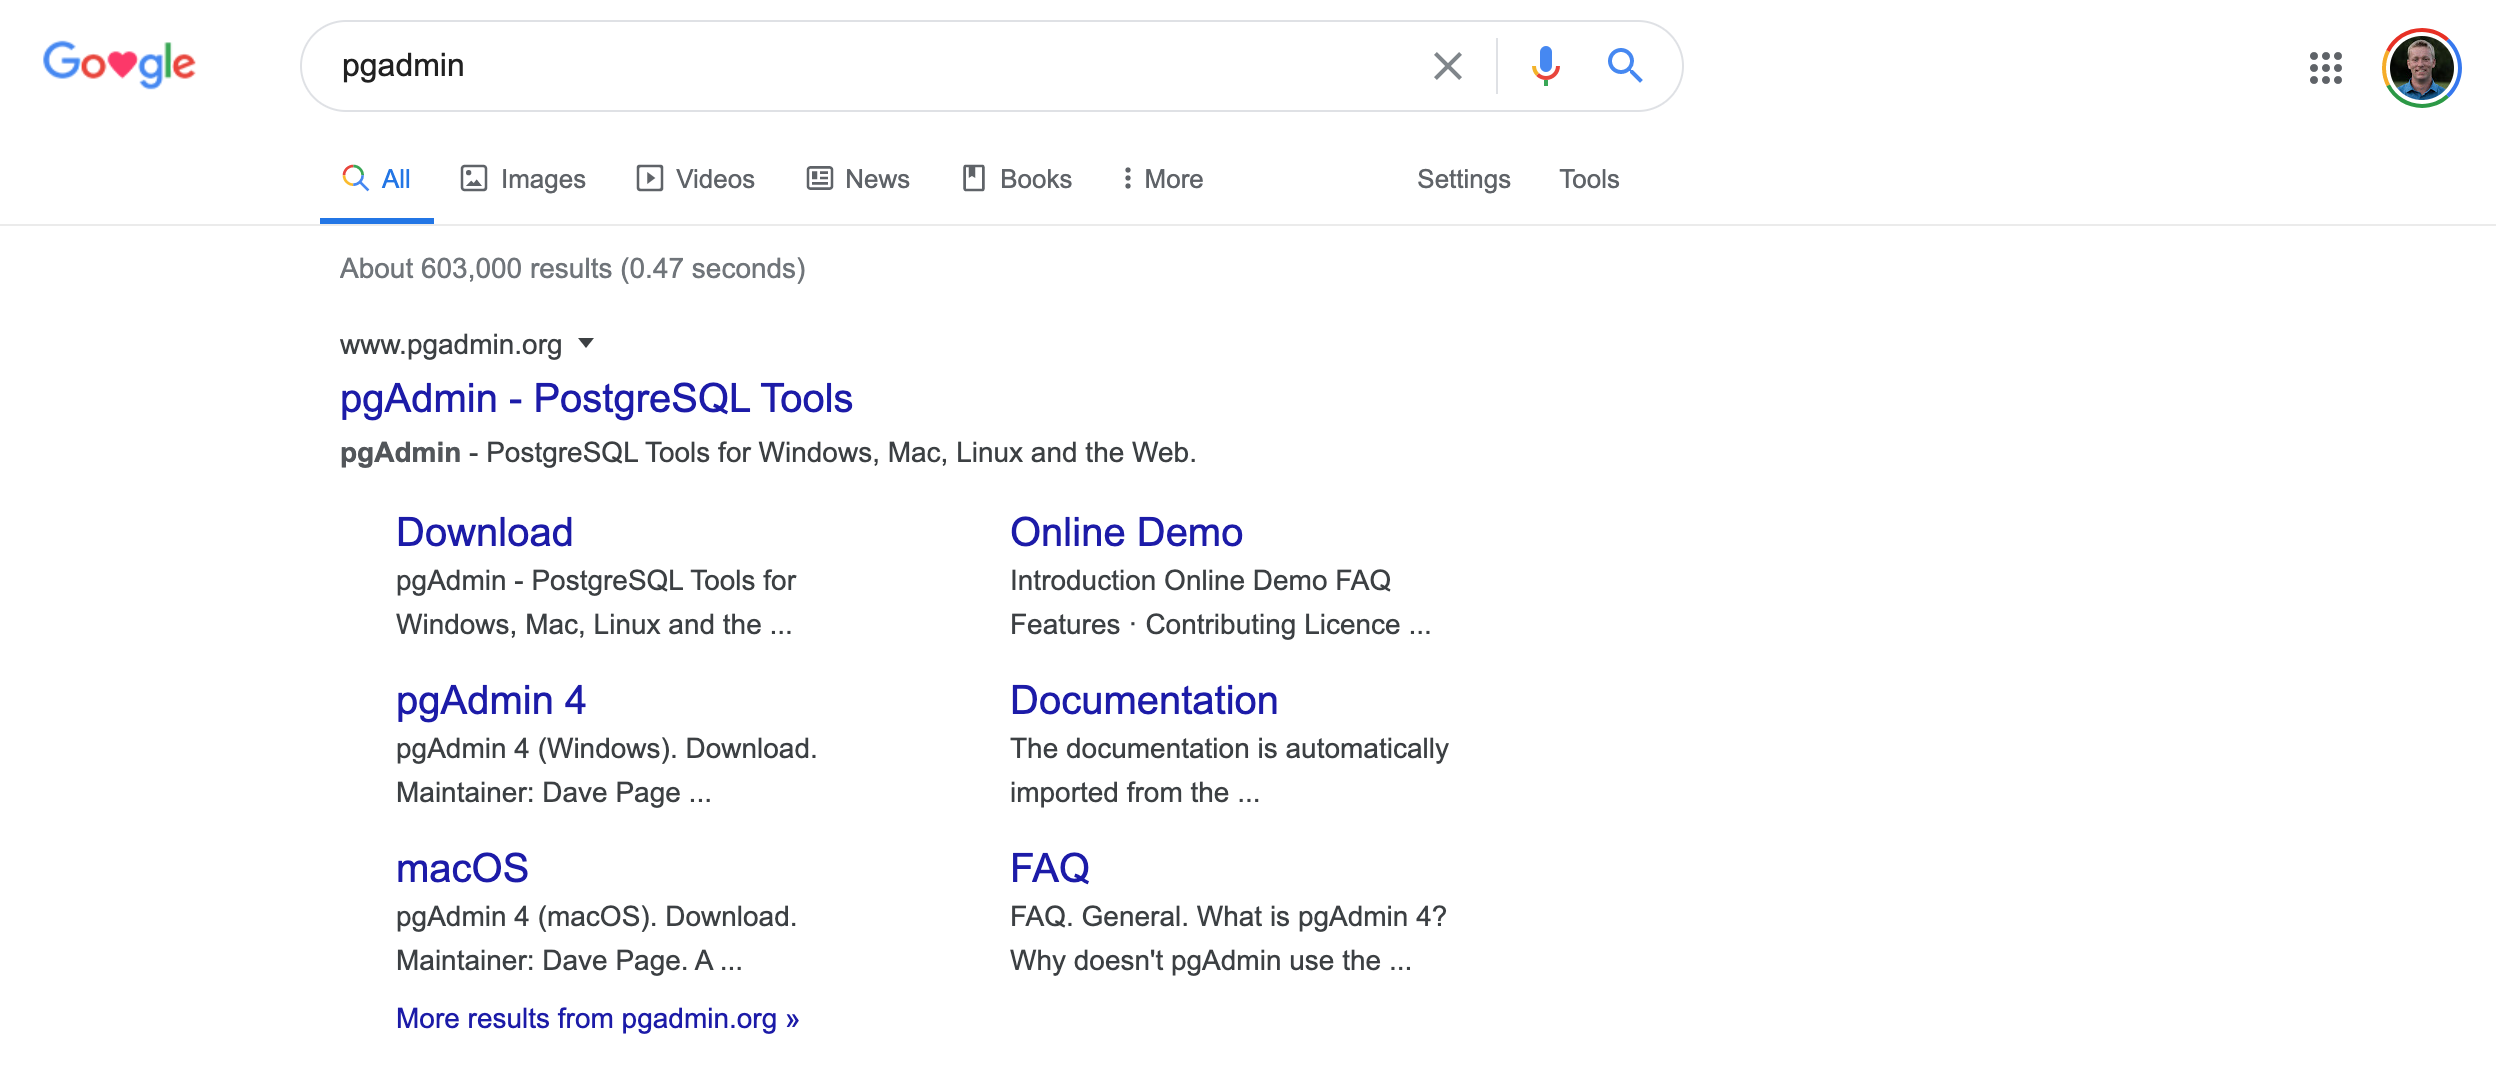
As before, the easiest way to start your download of pgAdmin is by running a Google search for pgadmin. The first result will take us to the page that we want:
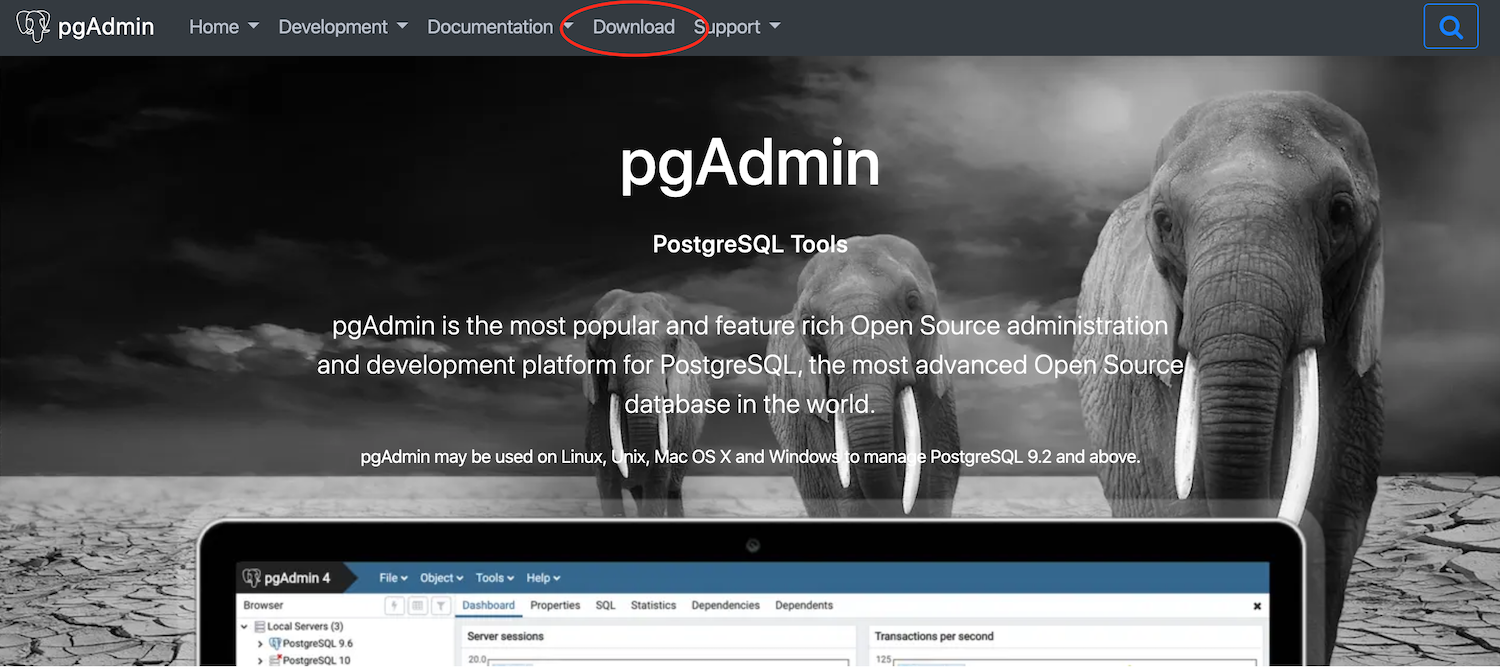
On the homepage of the pgAdmin website, there will be a download button in the top navigation bar. Click this button:
This page will list different distributions of pgAdmin for different operating systems. It will also list different versions of pgAdmin - such as pgAdmin3, pgAdmin4, etc.
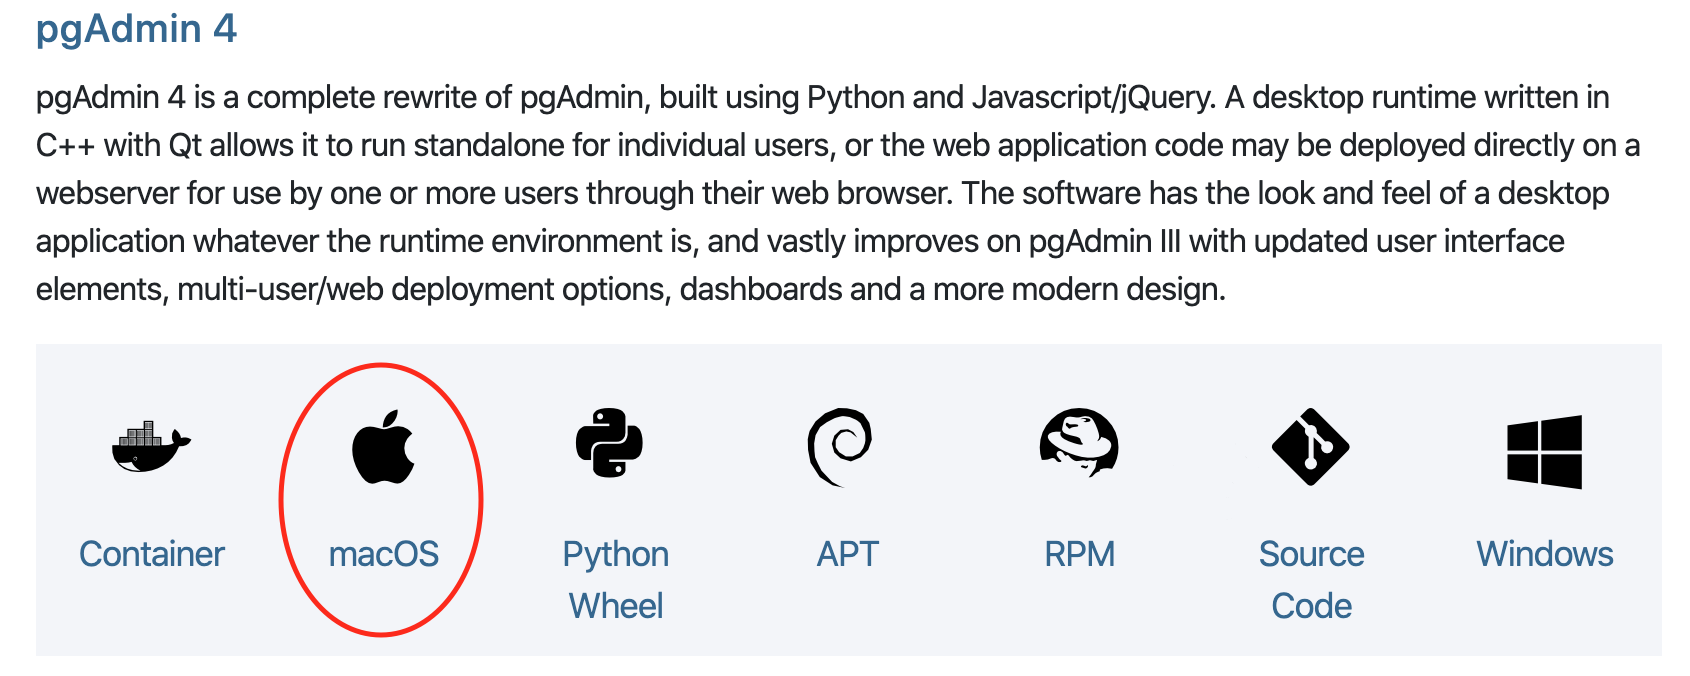
In this course, we will be working with pgAdmin4. Since I am writing this tutorial from a Mac operating system, I will scroll down to the pgAdmin4 section and click the button for MacOS, as shown below:
The next page will list the different versions of pgAdmin4, such as pgAdmin4.18, or 4.19. Click the latest version to proceed to the next page.
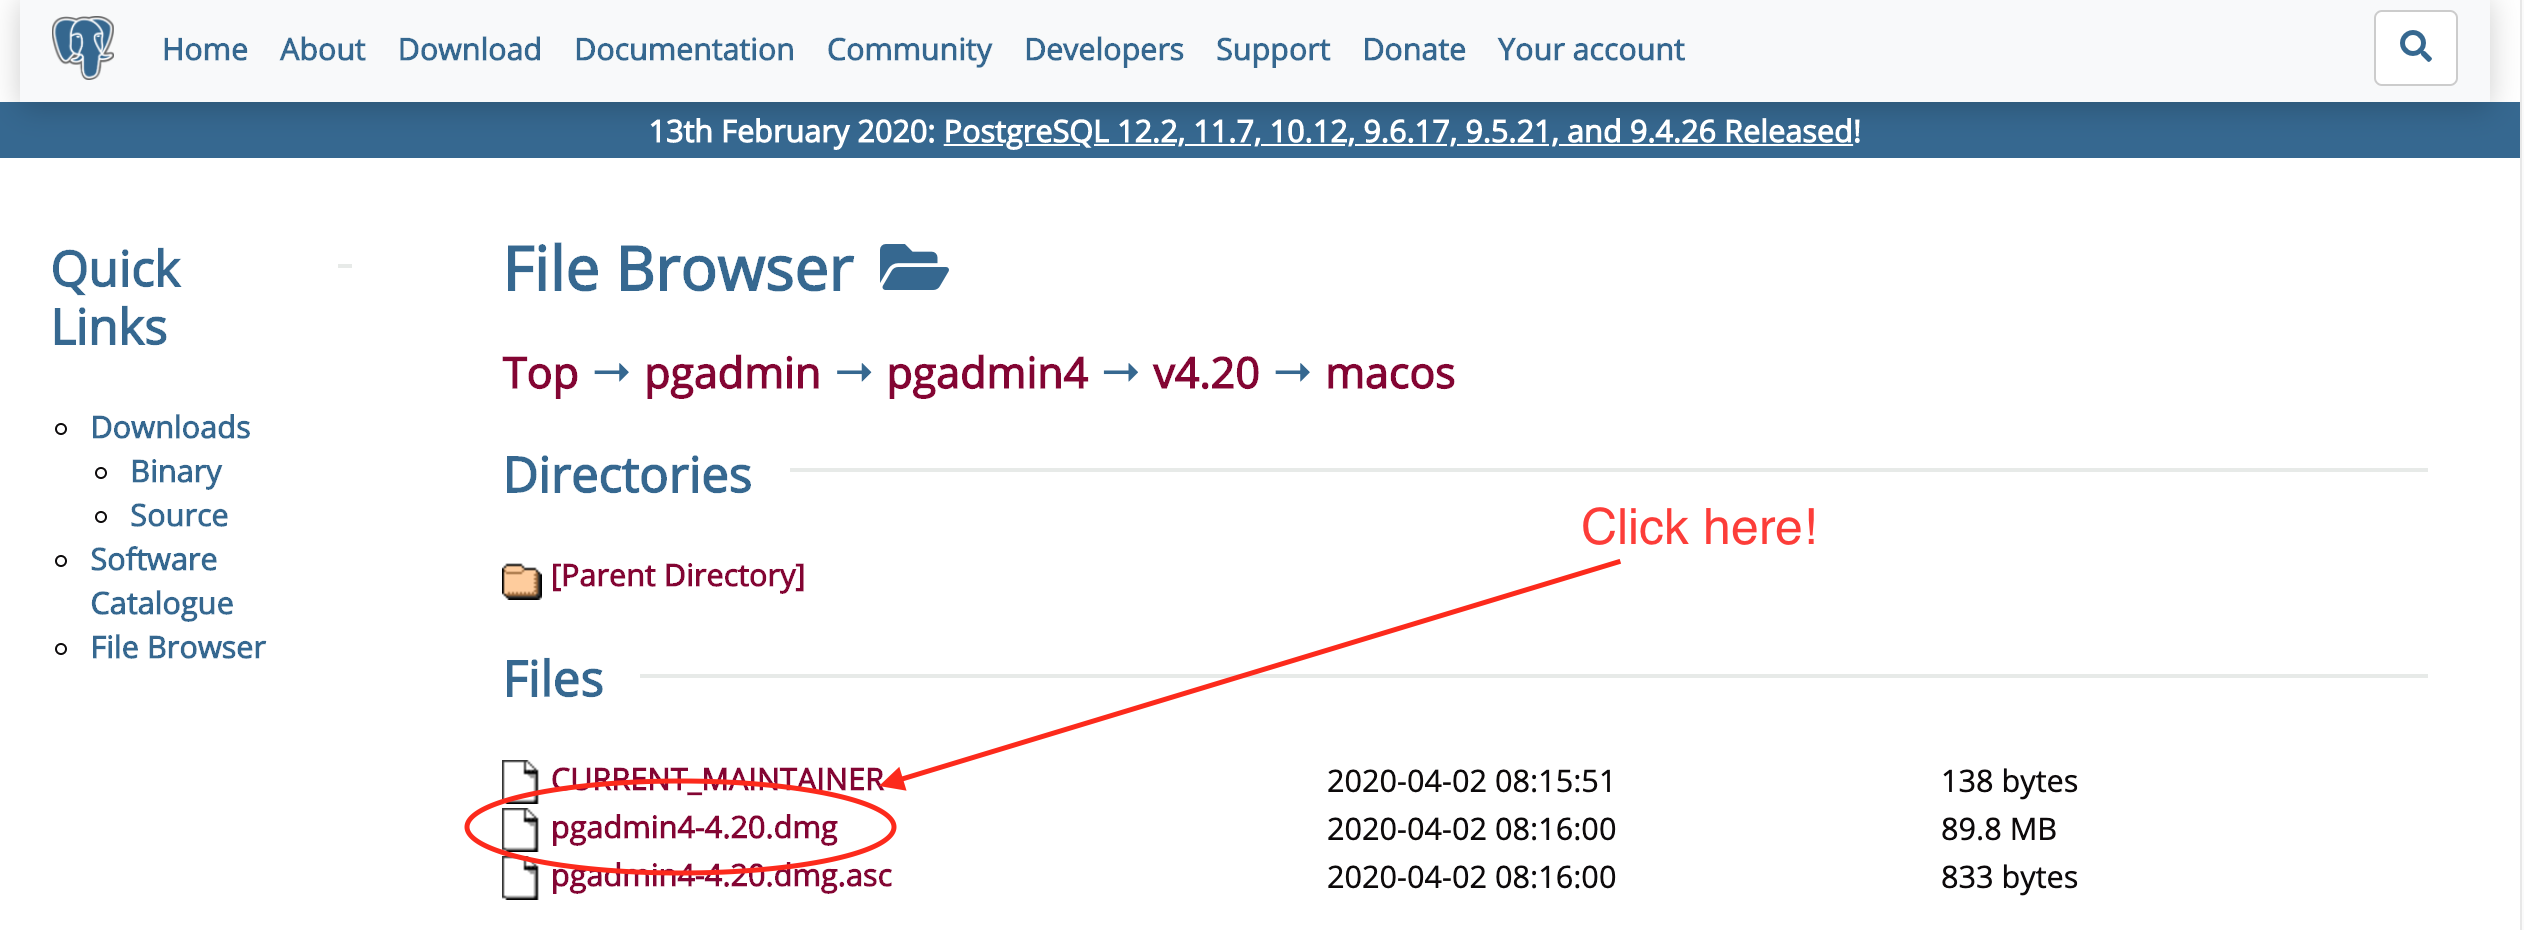
The next page contains many files available for download. The file we are looking for is the .dmg file, which is the file extension for software installers. Click the .dmg file to download the pgAdmin4 installer.
Congratulations - you have now downloaded the installer for pgAdmin4! In the next section, we will work through the installer on a step-by-step basis.
Step 4: Install PgAdmin
Now that we have downloaded the installer for pgAdmin, it's time to install it. Let's start by clicking the .dmg file that we downloaded in the last step.
This will open an installer window that asks you to accept the license agreement for pgAdmin. Click Agree. This will cause the .dmg file to open, which may take up to a minute. After the .dmg file opens, you will see the following window open:
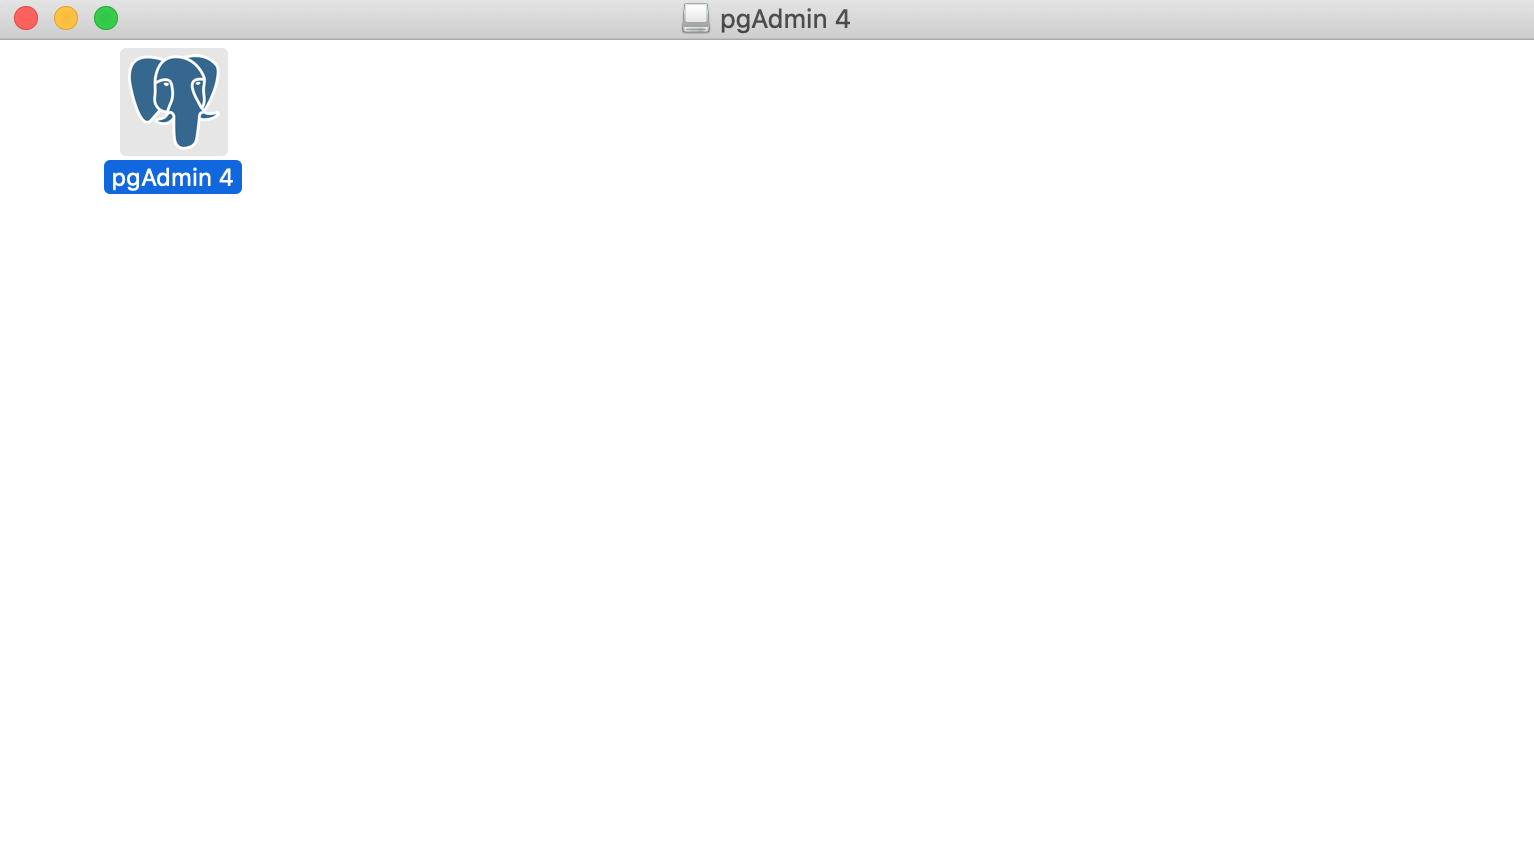
This is a temporary drive on your Desktop. What we need to do is move this into our Applications folder. To do this, open up your Applications folder beside this new window, and drag-and-drop the pgAdmin 4 application into your applications folder.
This finishes the installation process! In the next section, I will show you how to download our sample database.
Step 5: Download The Course's Database
In this section, I will show you how to download our sample database for this course, which is called the DVD Rental database. Before we get started, I wanted to mention two things:
- Do not directly open the
.tarfile that we will be downloading in this section. It is only meant to be interacted with through pgAdmin. - I cannot actually claim any credit for the sample database that we will be using in this course. It is the same open-source database that postgreSQL uses on their website in their tutorial.
To make sure that all of my students are using the same version of the DVD Rental database, I have saved a version of it and uploaded it directly to my website.
Click here to download the database. This will download a .zip file, which upon unzipping will place a new .tar file into your Downloads folder.
Step 6: Restart Your Computer
To make sure that all of the postgreSQL-related changes that we've just made have been properly implemented by your computer, you'll now need to restart it.
That is all that is required from this step! In the next section, I will show you how to import the DVD Rental database into pgAdmin4.
Step 7: Import the DVD Rental Database Into PgAdmin4
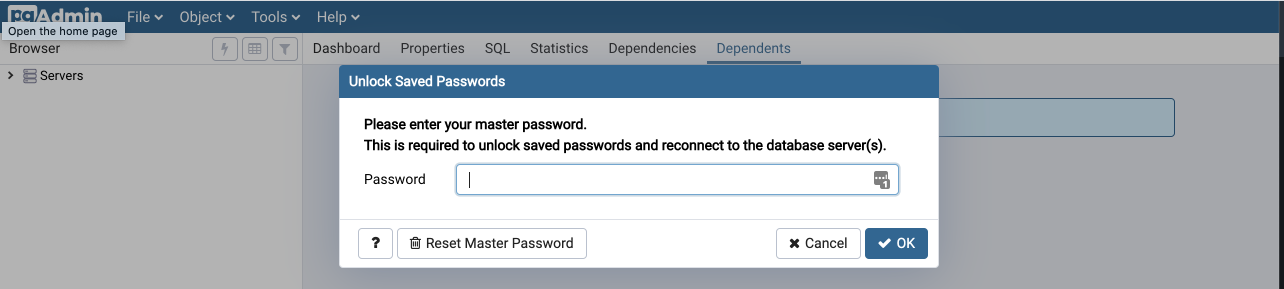
First, open up pgAdmin4 from your applications folder. Since pgAdmin4 actually runs in a browser window, this will simply open up a new browser window (or a new browser tab if you already have a window open).
The first prompt that you will see is a window asking you to enter your master password:
Once you type in your password, you will see the main screen for pgAdmin4! Click the "Servers" button on the far left side of the screen, then click "PostgreSQL 12" (or whatever version of postgreSQL you decided to download).
This will ask you for your password for postgres, which is the same password that we used in the initial installation of postgreSQL earlier in this lesson. Once you type in this password, you will be successfully connected to postgreSQL!
Now we need to import the database from the .tar file. To do this, click PostgreSQL12, then Databases. Right-click on Databases and click Create -> Database… as shown below:

A window will appear asking you to name the database. Call it DVD Rental and click save.
The DVD Rental database will now appear in pgAdmin4:

Now that the DVD Rental database has been created, right-click on it and select Restore. The following window will appear:
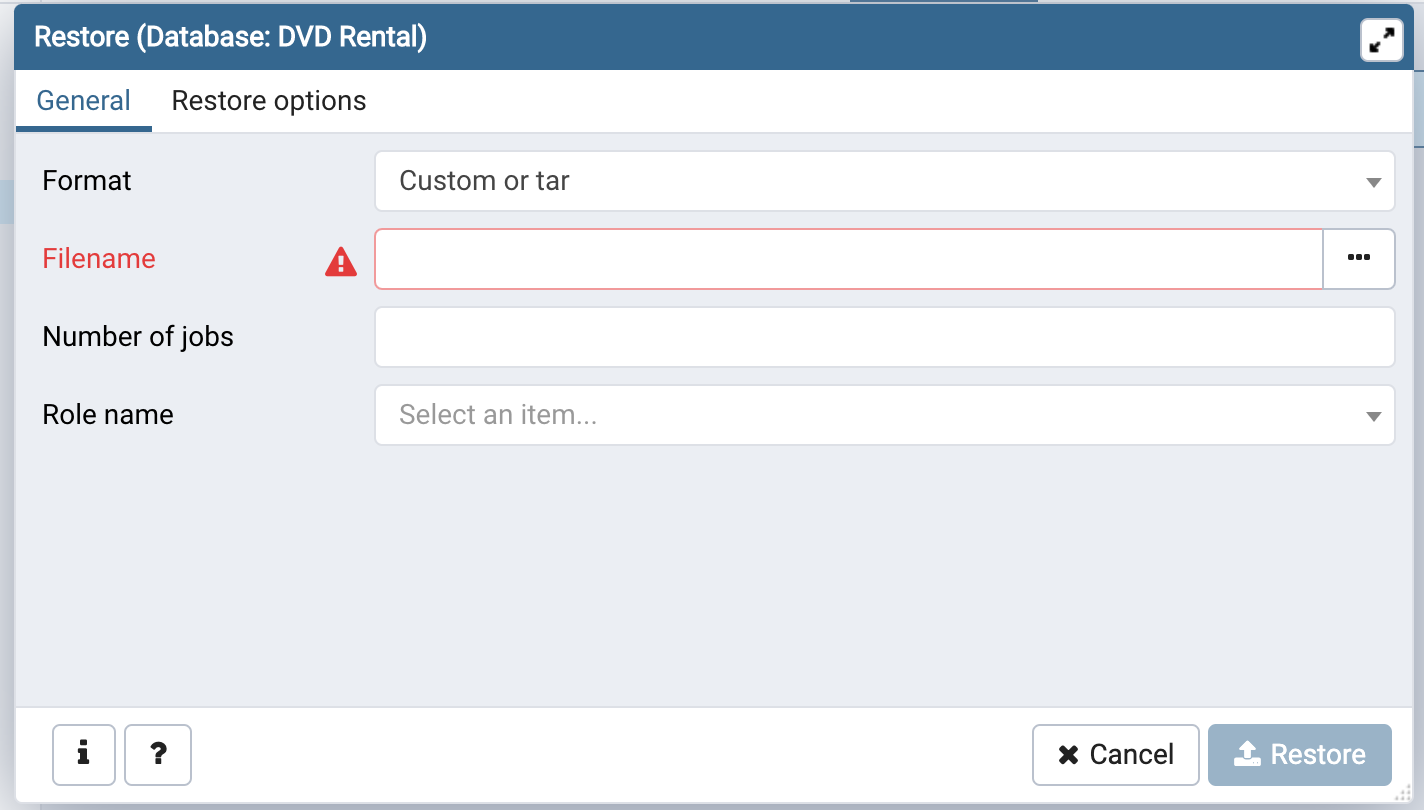
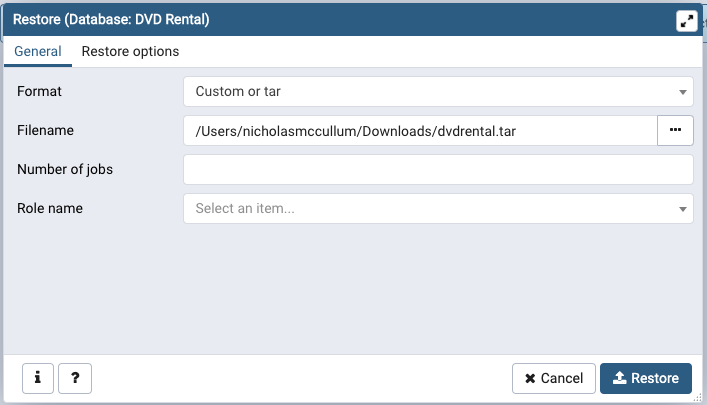
Click the three dots on the right of the Filename field to open up a Finder window. Within this Finder window, select the .tar file from your downloads folder that we downloaded earlier in this lesson. Note that you may need to change format to All Files in the bottom right corner of this window for this to work properly.
Once you have properly selected the .tar file, your window should look something like this:
The next thing you need to do is navigate to the Restore Options tab and change the Pre-data, Post-data, and Data fields to Yes, like this:
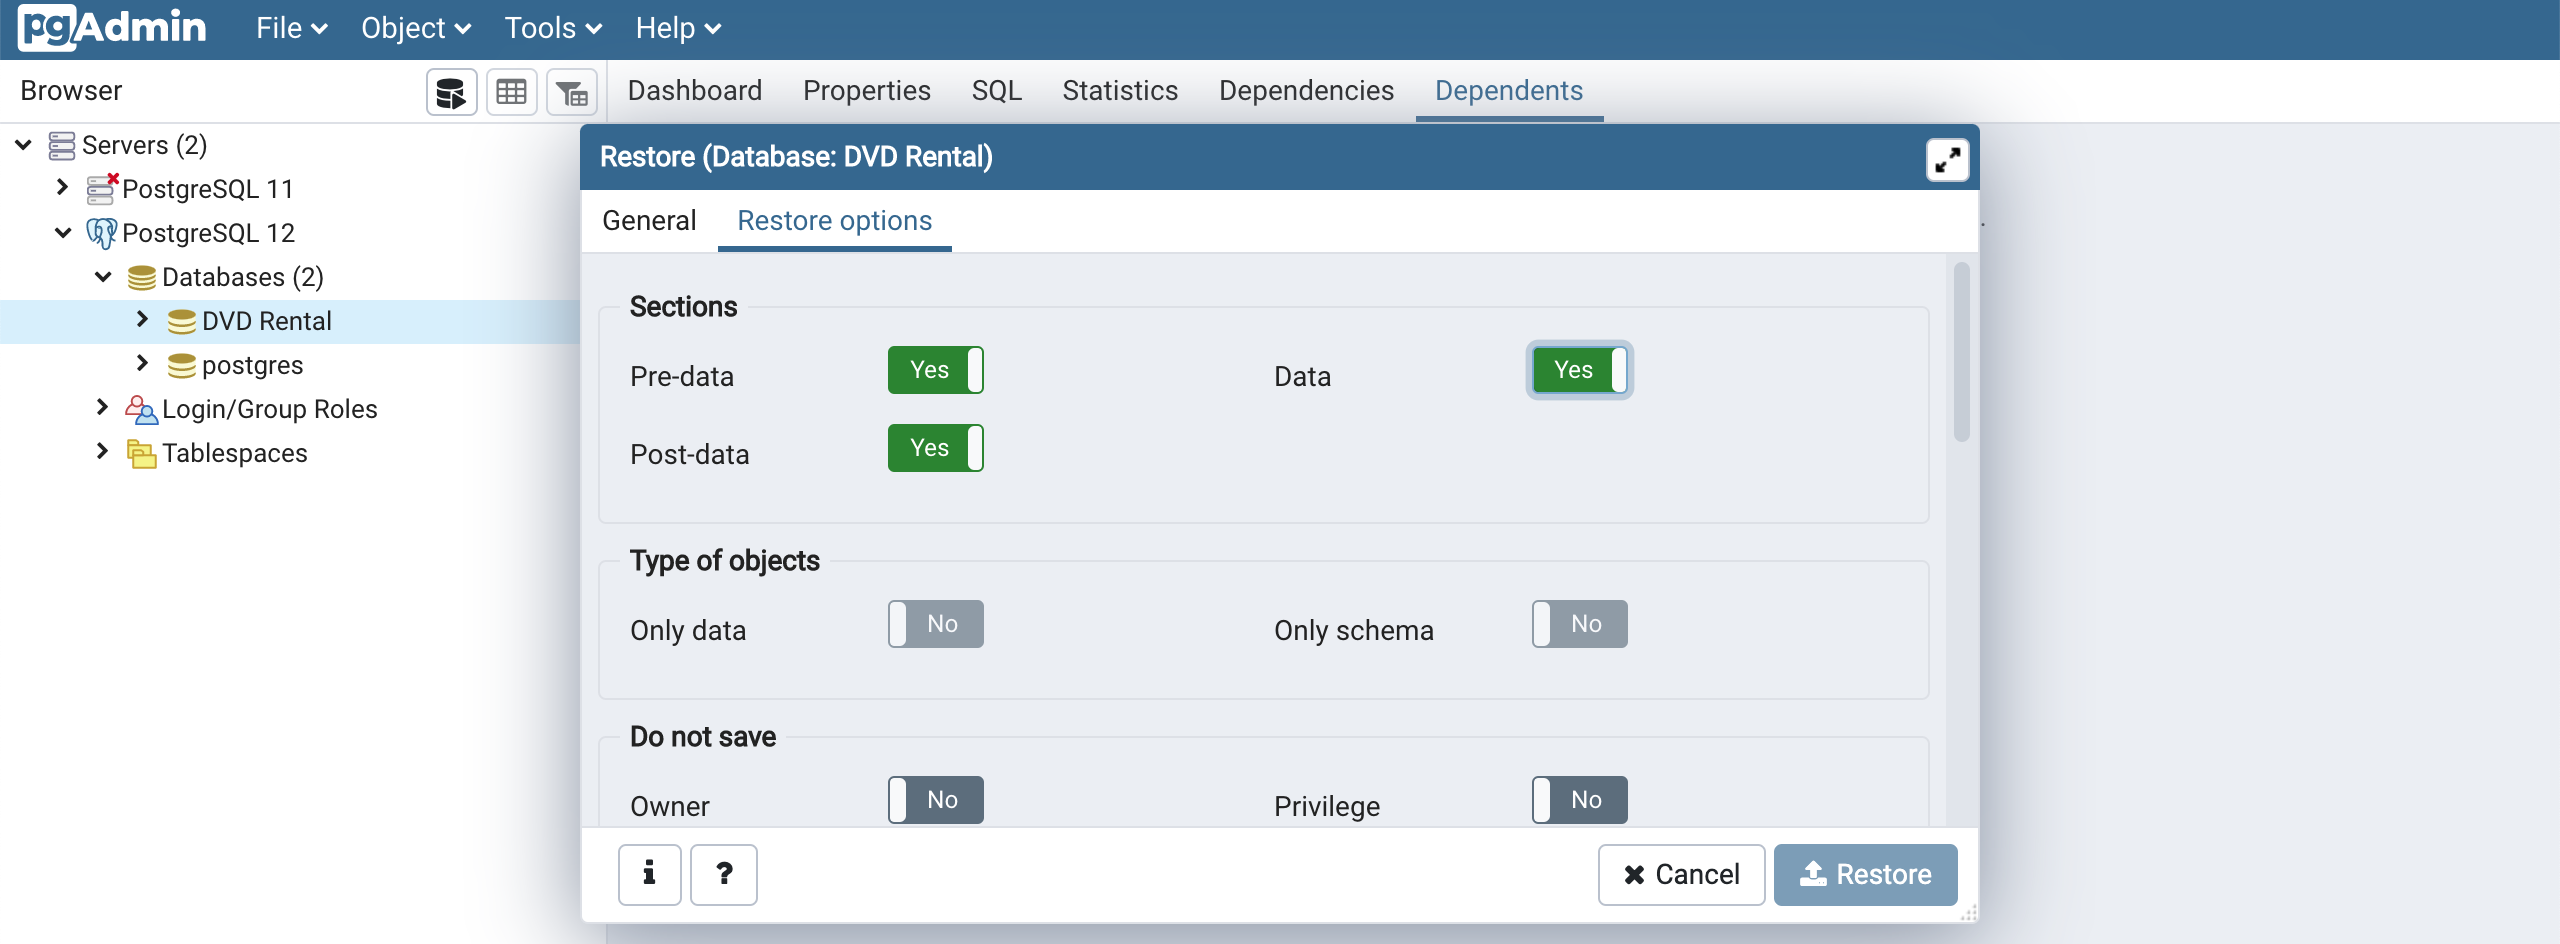
Click Restore to proceed.
Step 8: Test To Make Sure The Import Worked
Our last step is to make sure that we imported the database successfully.
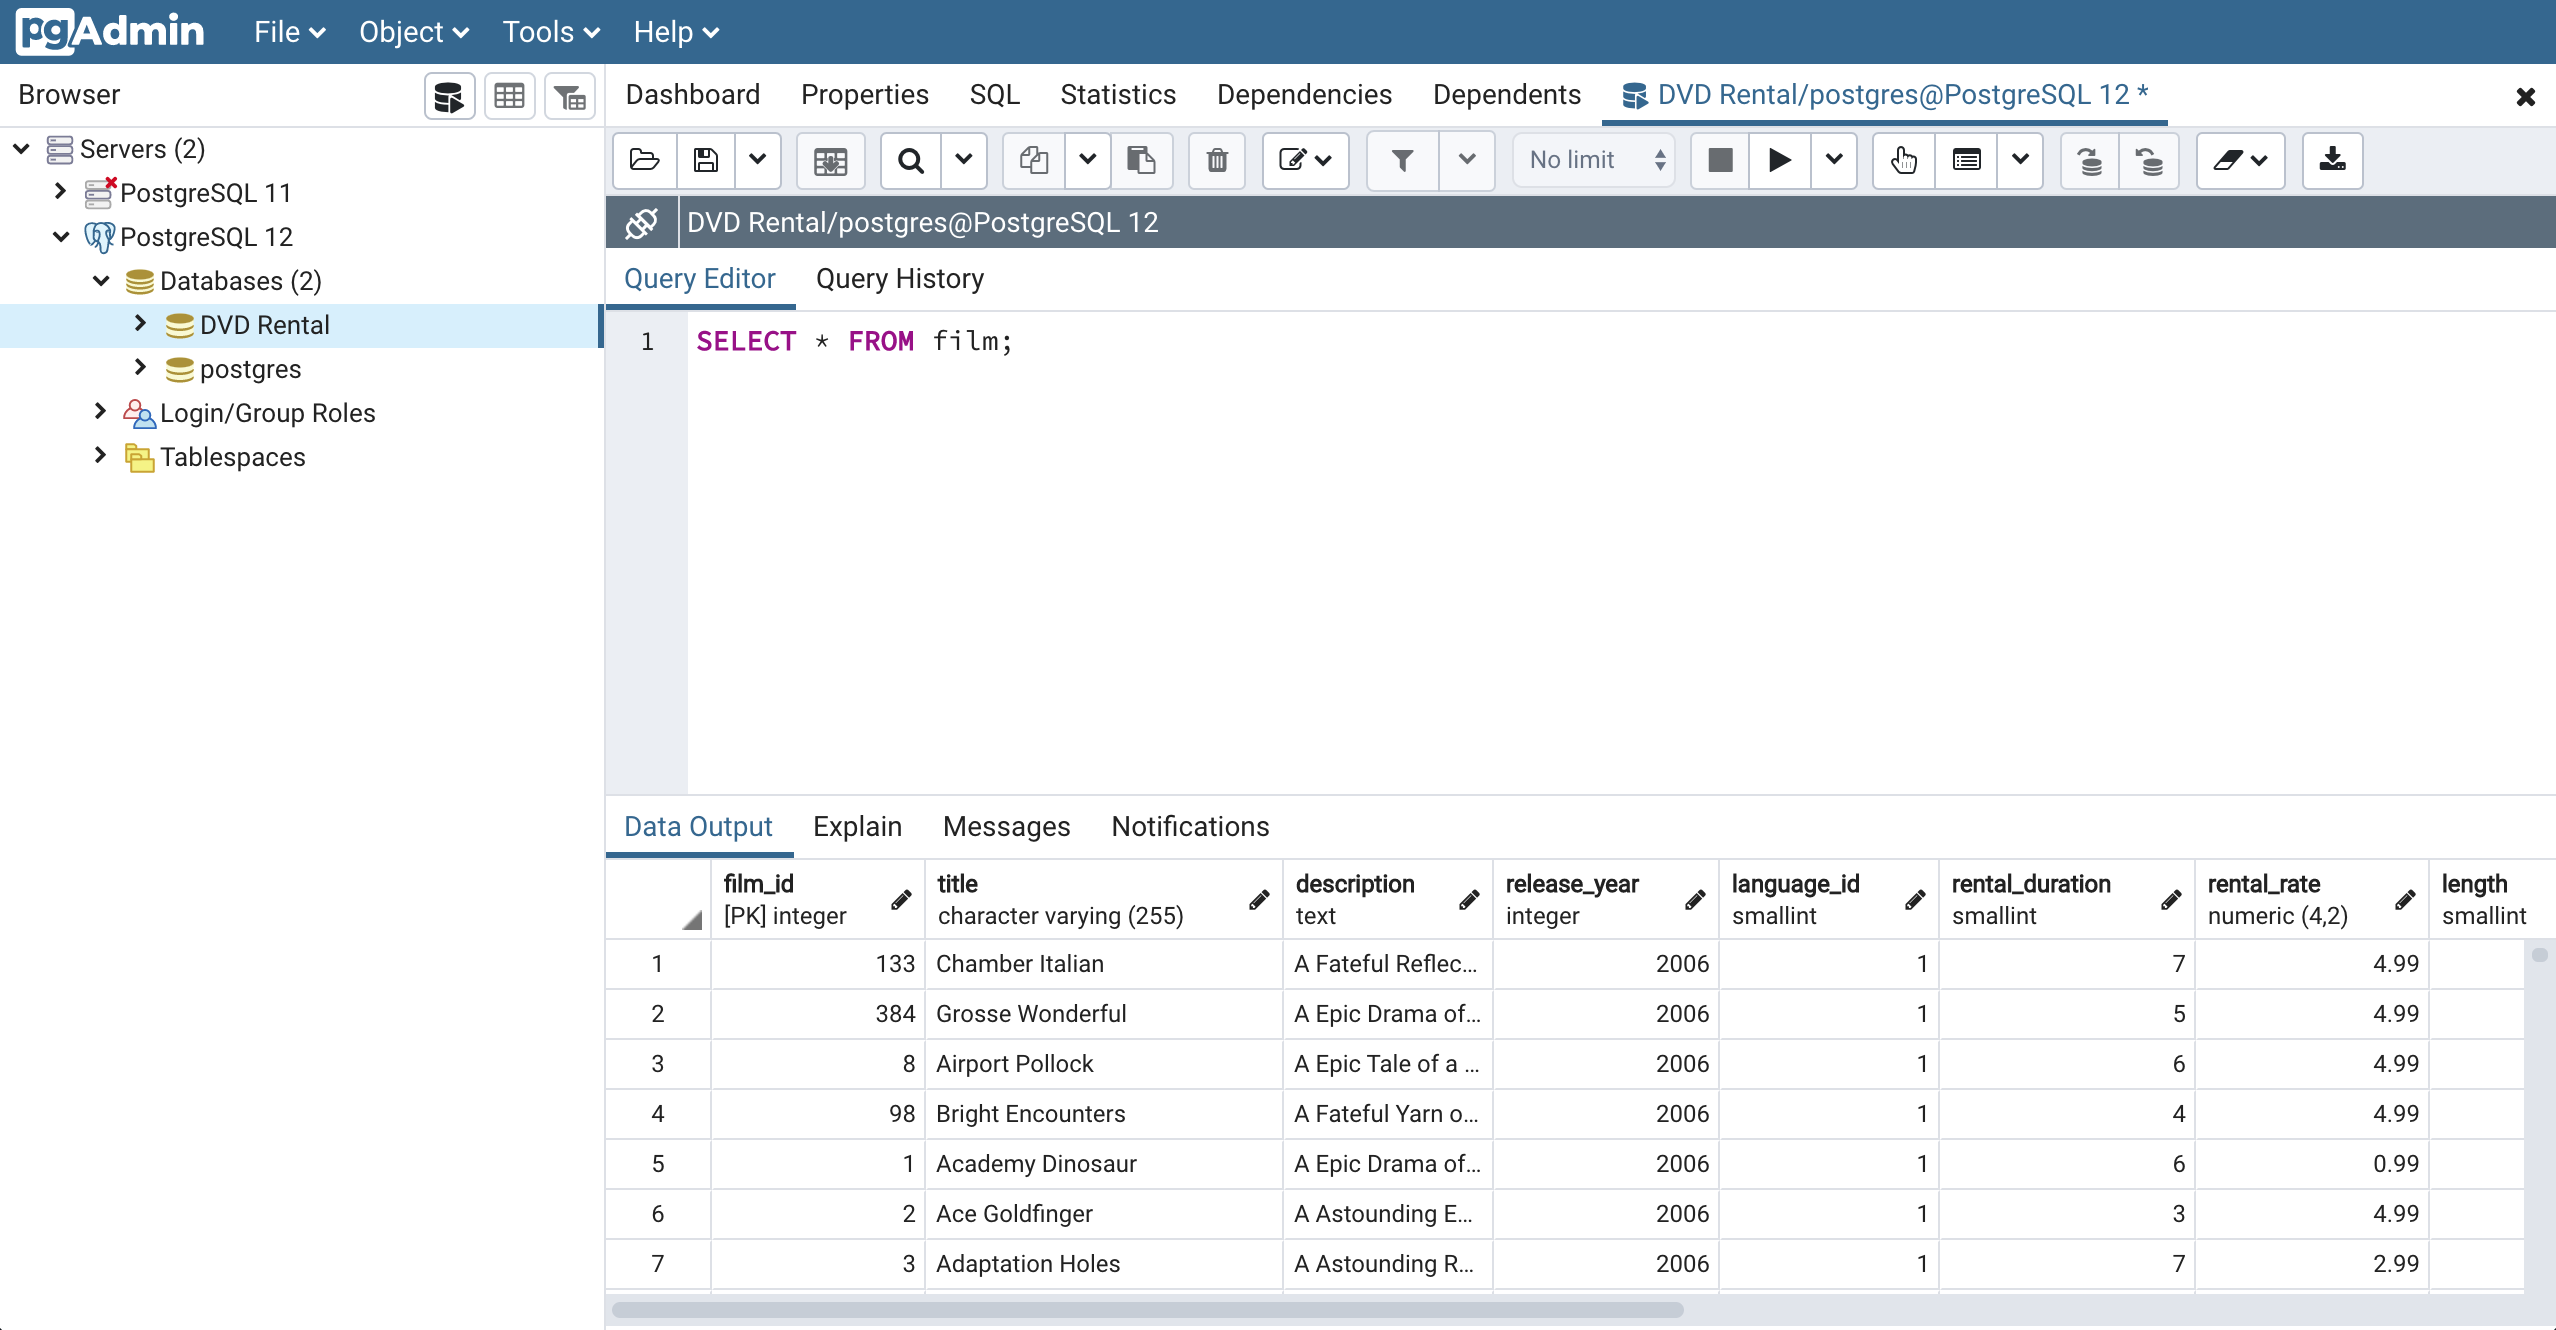
To do this, right-click on the new DVD Rental database and click 'Query Tool'. A new window will appear in pgAdmin4. Within the space below 'Query Editor', type the following SQL command:
SELECT * FROM film;If data appears below your query as shown in the image below, then your installations have worked and we are ready to proceed!
Final Thoughts
In this lesson, we installed the necessary software to run PostgreSQL on your computer and query it using pgAdmin4. We will begin learning the various SQL commands in the next lesson.